RIO Ready V4: Payments2Us Components Setup
Table of Contents
Overview
This article provides a guide to setting up the payments2Us components after installing RIO Ready V4: Payments2Us Components. The configuration comes with 2 parts::
A. Prepayment page and components.
(This will be the bridge that allow us to access the Payments2Us payment page in the Community.)
B. Payments2Us itself.
(The actual app that will be doing the payment processing.)
Permission (Objects/Fields/Apex Classes/User permission)
Grant the necessary permissions for each component to users. Ensure these are assigned to the relevant profiles or permission sets.
| User Type | Type of Permission | Component Name | Access Type |
| Admin | Custom Field | AAkPay__Payment_Txn__c.redu_Transaction_Order__c AAkPay__Payment_Txn__c.redu_Transaction_Payment__c |
Read/Write |
| AAkPay__Payment_Type__c.redu_Purpose__c | Read/Write | ||
| Student | Apex Class | redu_Payments2UsComponent_LCTRL | Enable |
Prepayment components
Steps for implementing Prepayment components
1. In the community builder, click the top menu and “+ New Page”
2. Click “Standard Page”, then select the preconfigured page - “Prepayment” and click next.
3. Insert the Name and URL as below and click create.
Name: Prepayment
URL: prepayment
4. Navigate to the Prepayment page >> Properties, update the following:
- Page Access: Requires Login
- Tick the option “Override the default theme layout for this page.”. Set the Theme Layout as “Student”.
5. Publish the changes.
Setup Payments2Us
Full reference: https://help.payments2us.com/m/installation
Here is a summary of the minimum setup to enable Online Payment functionality after installing Payments2Us:
1. Make sure you have assigned the following permission set to your user
- Payments2Us Admin Users
2. Navigate to the app - Payments2Us setting
3. Select the tab “About Payments2Us”, then click the button “Create Remote Site Setting” if the option is available, following by “Create Samples”.
4. Navigate to tab “Payments2Us Settings”
5. Select the tab “App Settings” and click on the button “Authorise Payments2Us” if the button is present.
Note: Make sure to follow the screen instruction given in the Authorise Payments2Us process and to grant access to the API when requested. If everything is completed successfully, we should see something like the following in Payments2Us Settings -> App Settings.
6. Assign permission set “Payments2Us Sites” to site guest user.
- Navigate to Setup >> Sites and Domains >> Sites
- Click the site “Payment” >> Public Access Settings >> View Users
-
Click the guest user “Site Guest User, Payment” and assign the permission set “Payments2Us Sites”

Reference: https://help.payments2us.com/m/installation/l/824439-how-to-create-a-new-force-com-site
Note: If error is encountered when attempting to assign Permission Set for the Payment Site Guest User, check and make sure that the User is Active.
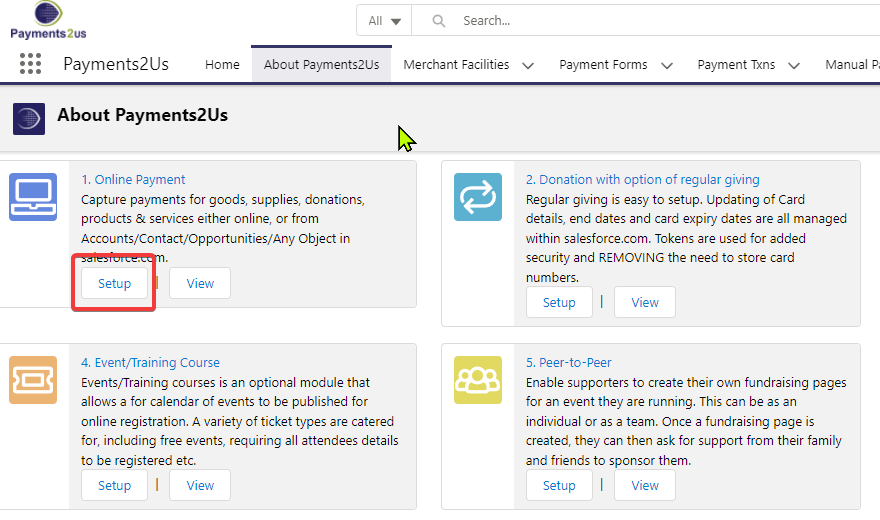
7. Still in About Payments2Us tab, once the sample data is created, click on Setup under the Online Payment section shown in the screen.

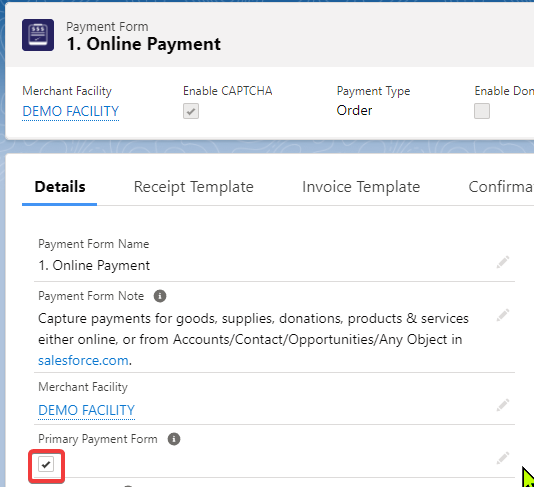
8. In the Payment Form we will see, set Online Payment as Primary Payment Form by checking the field shown below:

9. Please note that the ‘Purpose’ field in the payment form needs to be populated. It will match with the transaction order ‘Type’ field to determine which payment form will be used.

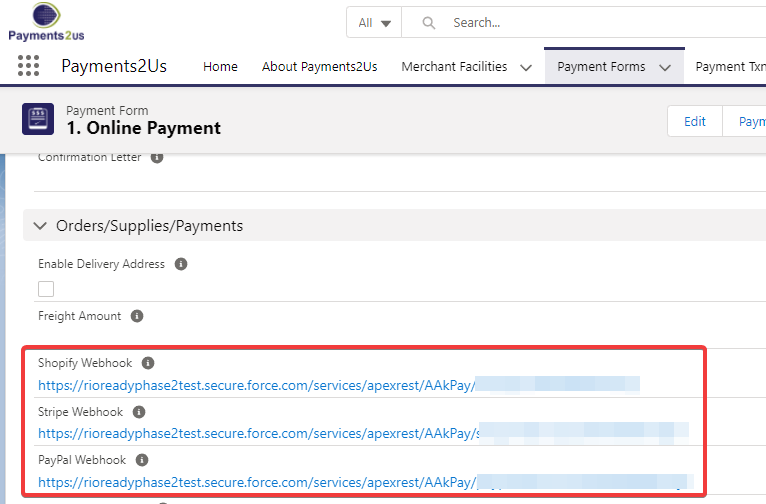
10. Next, note the lines on Webhook under the Orders/Supplies/Payments section.

This will be needed in setting up the connection with the payment platform of choice.
In this example, we will be using Stripe to illustrate the process, so note the Stripe Webhook and copy the value we see in the record for the next part.
11. We will not be creating a new Merchant Facility for this example and instead reuse the sample Merchant Facility provided by the sample and edit it to suit our need instead.
Follow this guide to setup the configuration with Stripe. Note that if we are not using Stripe then this step will be replaced with the one corresponding to the payment platform of choice, for now we'll assume Stripe is chosen.
Reference: https://help.payments2us.com/m/installation/l/824458-how-to-setup-stripe
Replace the value of the fields in DEMO Facility with the one mentioned in the Stripe setup manual above, for fields not mentioned in the manual leave it as the original value that comes with DEMO Facility record.
In this example we also assume that the Primary Payment Form is 'Online Payment' so when instructed to click the Primary Form name from the related list, make sure to click on 'Online Payment'.
12. Make sure that the Merchant Facility (DEMO Facility) record is Active and Primary field is checked.
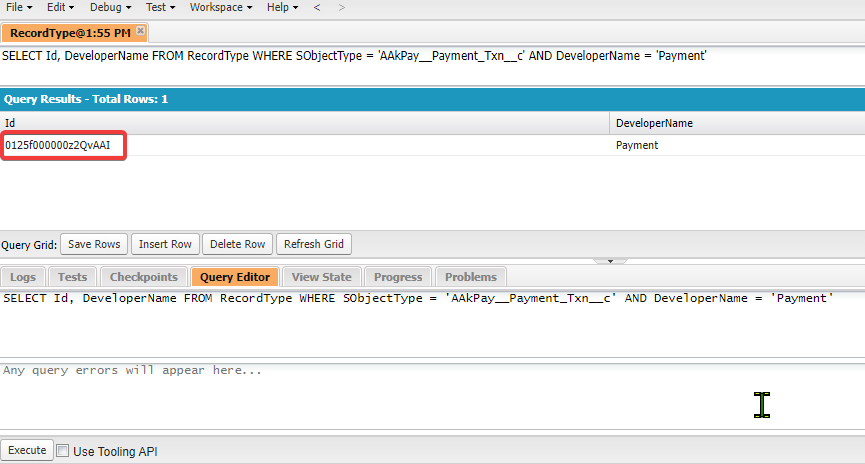
13. Put the Record Type ID for the Payment Transaction into the Custom Setting, RIO Education Settings under the field 'Payment Trx Payment RT Id'.
To find the RecordType ID value we can use this query in the anonymous console:

Copy the value, then put it into the Custom Setting as previously mentioned.

14. Put the value 'Awaiting Payment' into the Custom Setting, RIO Education Settings under the field 'Payment Trx Default Status':

And we're done with most of the configuration with only 1 last thing left which is to make sure that the Merchant Facility we selected knows the Site URL that we have created.
15. Follow the instruction here in order to make sure that the Merchant Facility (DEMO Facility in this example thus far) is configured correctly with our Site URL. Note that if the Payment Confirmation pop up shows up during the payment process but clicking on Confirm did not redirect properly into Payments2Us, then it most likely means that the Base Site URL in the Merchant Facility is not configured correctly.
Enabling the Payment Trigger
We're almost done, next we need to enable the trigger that is responsible for registering the payment made in Payments2Us into a Payments record that can be tracked by RIO Education. This is necessary to ensure that RIO Education reflects the payment already made when displaying the user's Payment page.
To do so:
1. Navigate to Custom Metadata Types > Click Manage Records for the 'Trigger Controller' metadata type.
2. Create a new record with the following details:

Setting Up Custom Metadata
This feature uses two custom metadata types:
Payments2Us Form Settings
This metadata is used to match the Purpose field in the payment form with the Type field in the transaction order. This configuration determines which payment form will be used.
Sample data:

Transaction Item Type Config
This metadata type specifies the applicable item type for each transaction payment created after a payment is made through the component. It matches the Item Type field in the custom metadata with the Item Type field in the transaction order record being paid.
Sample data:


.png)