Setting up RIO Ready for Demo or Prototype Instance
Table of Contents
This document outlines the steps to quickly set up RIO Education with RIO Ready within 1 hour (excluding the 1 hour waiting time). This document breaks down into 3 main sections as below:
- Package Installation.
- Community Configuration.
- Testing.
The outcome of the setup is to allow students to self-register from the Student Community and submit a Program Application. The student admin will be able to review the submitted Program Application and approve it.
Package Installation (Estimate ~ 1 hour)
The installation process takes around 1 hour.
- Install EDA using the installer here (average install time: 6 minutes).
- Enable Digital Experiences.
- Navigate to Setup >> Digital Experience >> Settings, tick the checkbox "Enable Digital Experiences".
- Enter your preferred domain name and click Save.
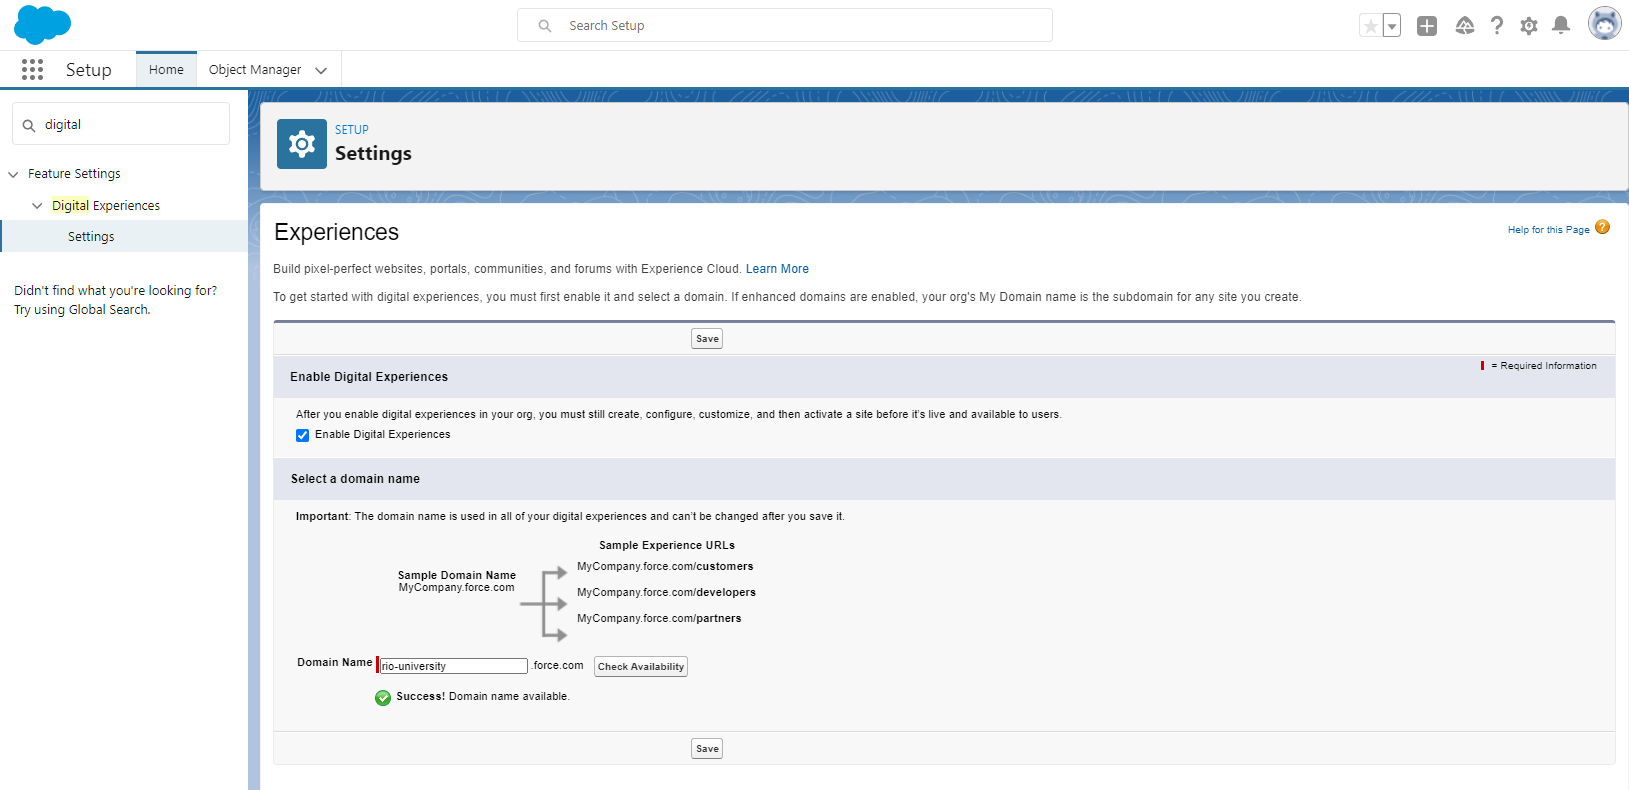 Note: This step is not required if the demo/prototype instance already has Digital Experience enabled. Please proceed with step 3.
- Install RIO Education using the installer here (average install time: 15 minutes).
- Select all the optional metadata.
- Select all the optional metadata.
- Install Org-Wide Default Sharing using the installer here (average install time: 5 minutes).
- Install Community Security Setup using the installer here (average install time: 1 minute).
- Select only the metadata "RIO Education - Combined Community Security Setup".
- Select only the metadata "RIO Education - Combined Community Security Setup".
-
Install Payments2Us from AppExchange here (average install time: 13 minutes).
- The Payments2Us metadata packages in the next step require Payments2Us apps. You can skip this step if the feature is not required in your Demo/Prototype.
- The Payments2Us metadata packages in the next step require Payments2Us apps. You can skip this step if the feature is not required in your Demo/Prototype.
-
Install S-docs from AppExchange here (average install time: 5 minutes).
- The Community Transcript metadata packages in the next step require the S-Docs apps. You can skip this step if the feature is not required in your Demo/Prototype.
- The Community Transcript metadata packages in the next step require the S-Docs apps. You can skip this step if the feature is not required in your Demo/Prototype.
- Install RIO Ready using the installer here (average install time: 10 minutes).
- Select all the optional metadata.
- Select all the optional metadata.
- Install Sample Data using the installer here (average install time: 6 minutes).
Community Configuration (Estimate ~ 30 minutes)
Update the Community to enable the Student Community to be ready for self-registration.
Google reCAPTCHA Setup
Before you start, you need to get the URL of your Community. This can be found from Setup >> Digital Experiences >> All Sites. For example: 
- Setup Google reCAPTCHA.
- Navigate to the Google reCAPTCHA website here and log in with your Google account.
- On the top right corner, click the + button:

- Fill in all the required fields and add your Community URL to the Domains list.
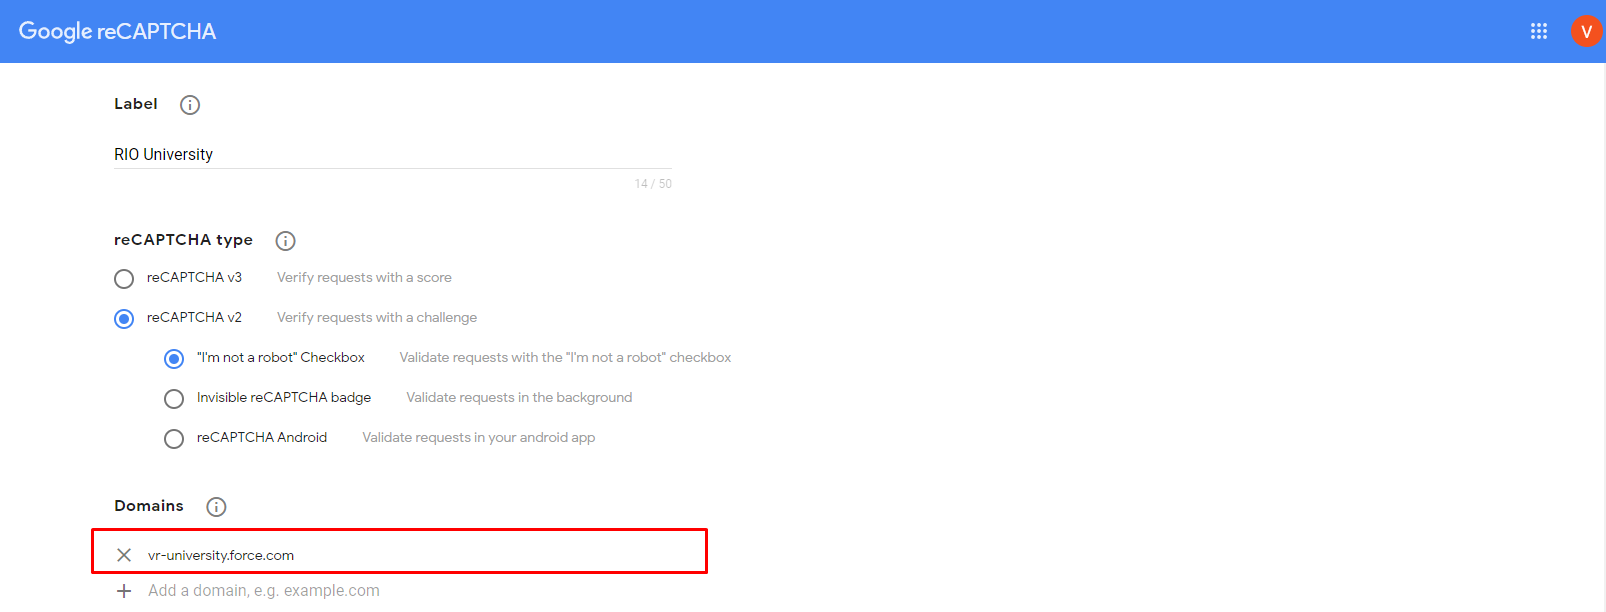
- Tick the checkbox "Accept the reCAPTCHA Terms of Service" and click Submit.
- Once this is done, you will receive the Site Key and Secret Key as below. Please keep these key for yourself as we will need them in the following setup.

- Navigate to the Google reCAPTCHA website here and log in with your Google account.
- Add CSP Trusted Site.
- Login to Salesforce and go to “Setup”.
- From Setup, in the Quick Find box, enter "CSP Trusted Sites".
- Click "New Trusted Site".

-
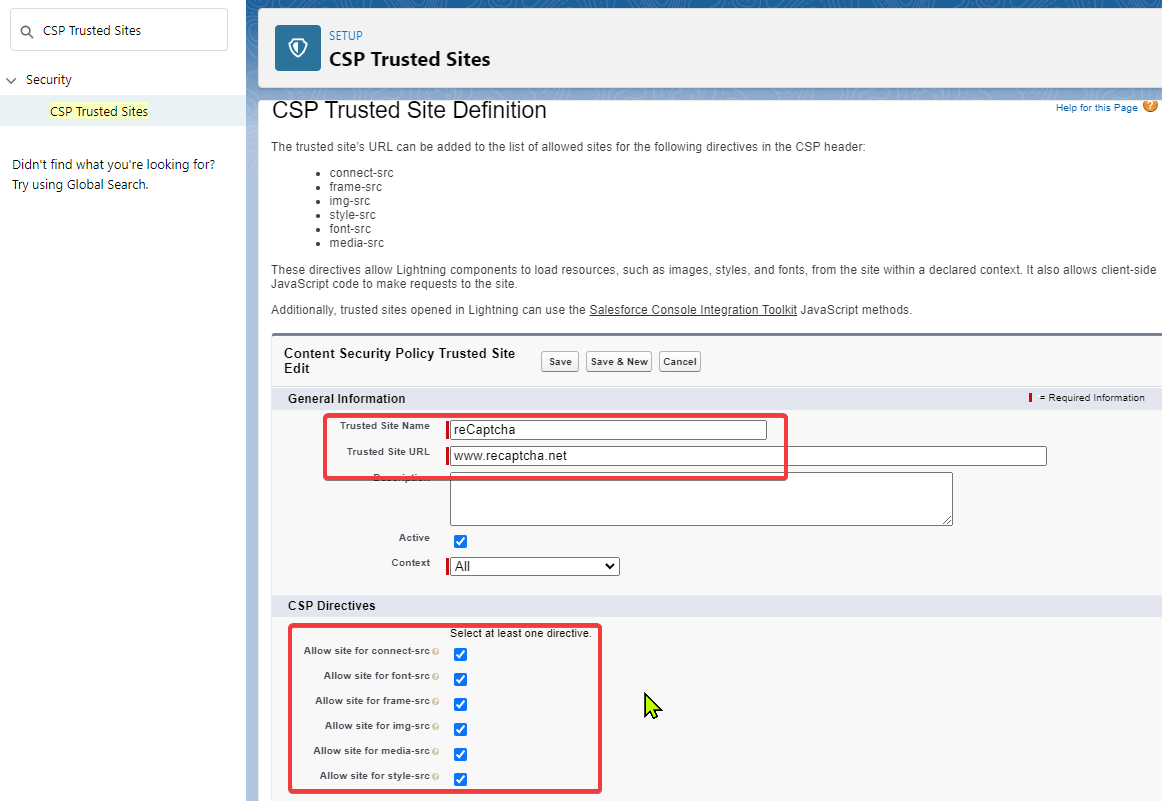
Enter a Name that can be easily recognized into the Trusted Site Name and put the following into the Trusted Site URL:
www.recaptcha.net
- Then, enable all CSP Directives:
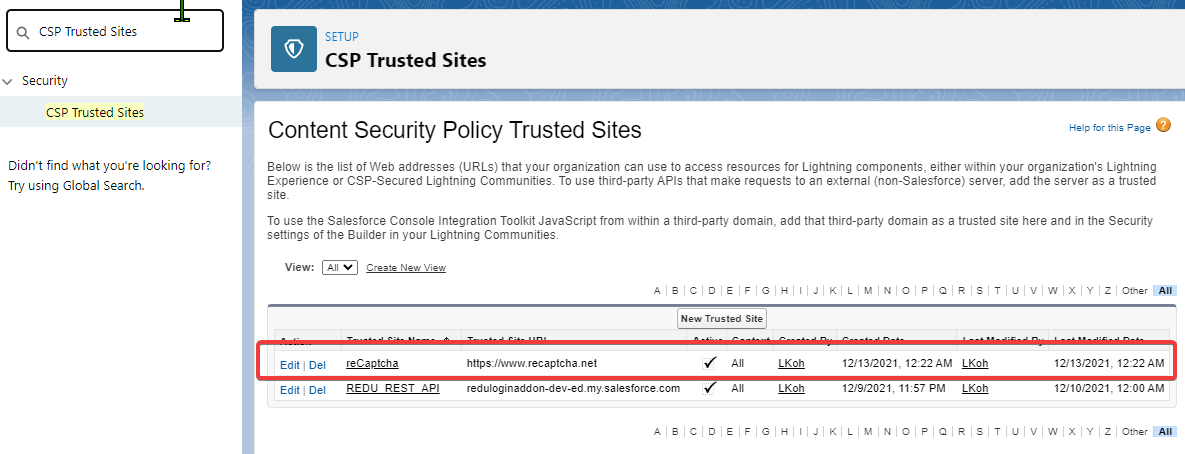
- When complete, you can see recaptcha.net in the list:
- Login to Salesforce and go to “Setup”.
- Set the reCAPTCHA Secret Key in Custom Setting.
- From Setup, in the Quick Find box, enter "Custom Settings".
- Click on "Manage" for RIO Education Settings.
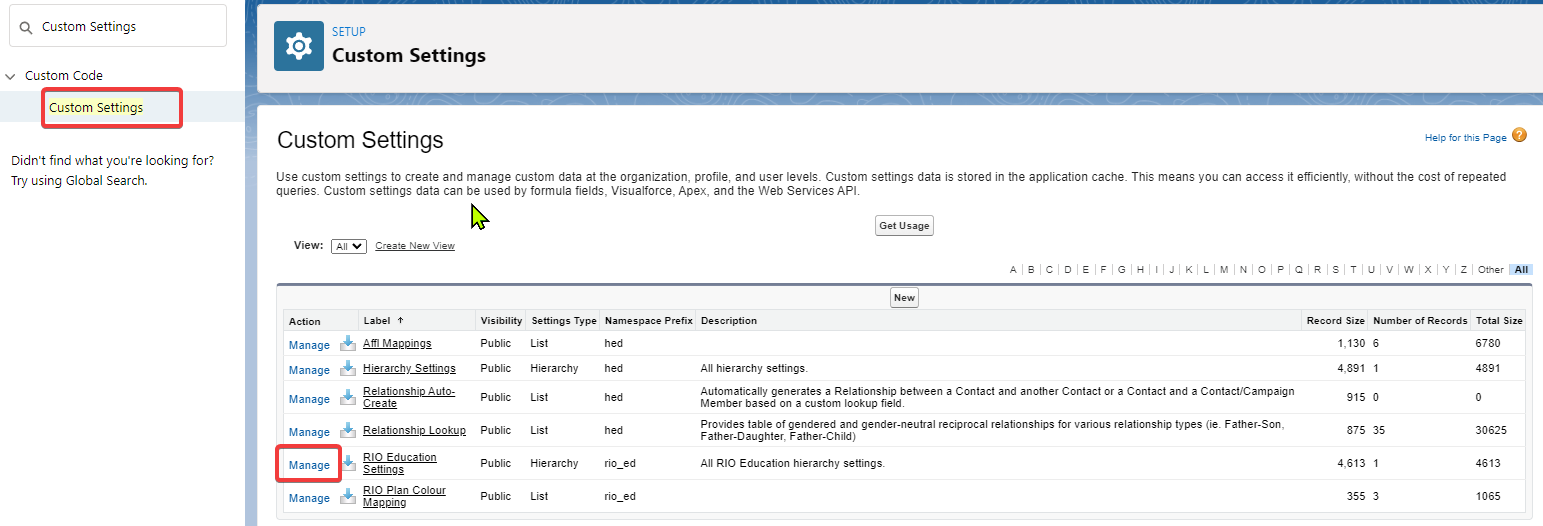
- Click on Edit at the top of the record then find the reCAPTCHA SecretKey field setting and enter the reCAPTCHA Secret Key inside.
- From Setup, in the Quick Find box, enter "Custom Settings".
Community Builder
- Navigate to Setup >> Digital Experience >> All Sites >> RIO Education Community and click on "Builder".
- From the top menu, click the Page Properties button (gear icon) below:

- In the "Find a page" text box, search for 'Login'. Then, select the login page.
- Replace the login form component with REDU Login Form.
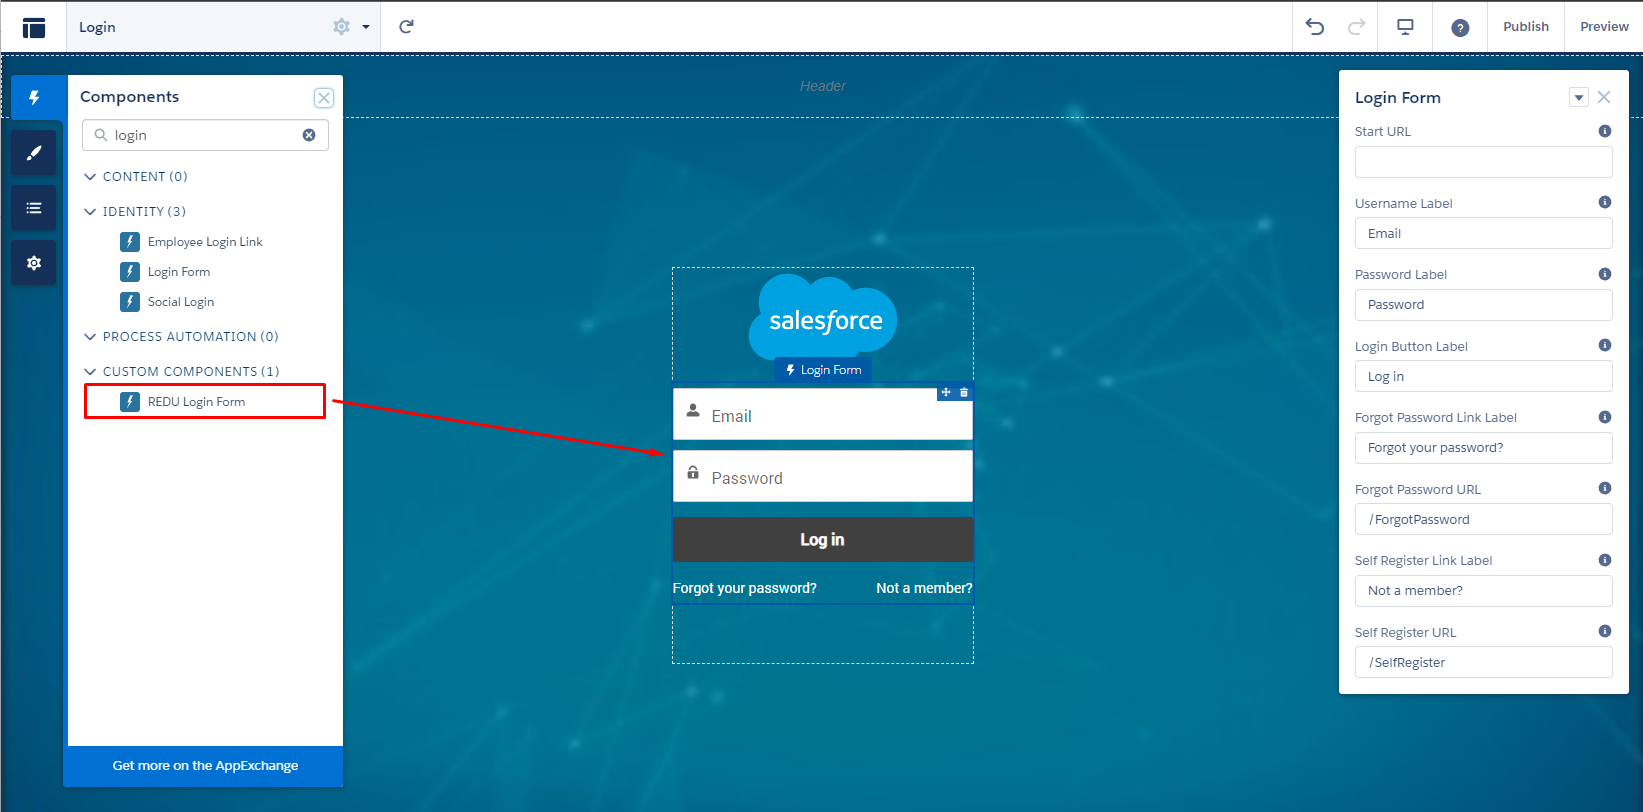
- Replace the login form component with REDU Login Form.
- In the "Find a page" text box, search for 'Register'. Then, select the login page.
- Make sure the REDU Self Register is configured on the page and the "includePasswordField" is checked.
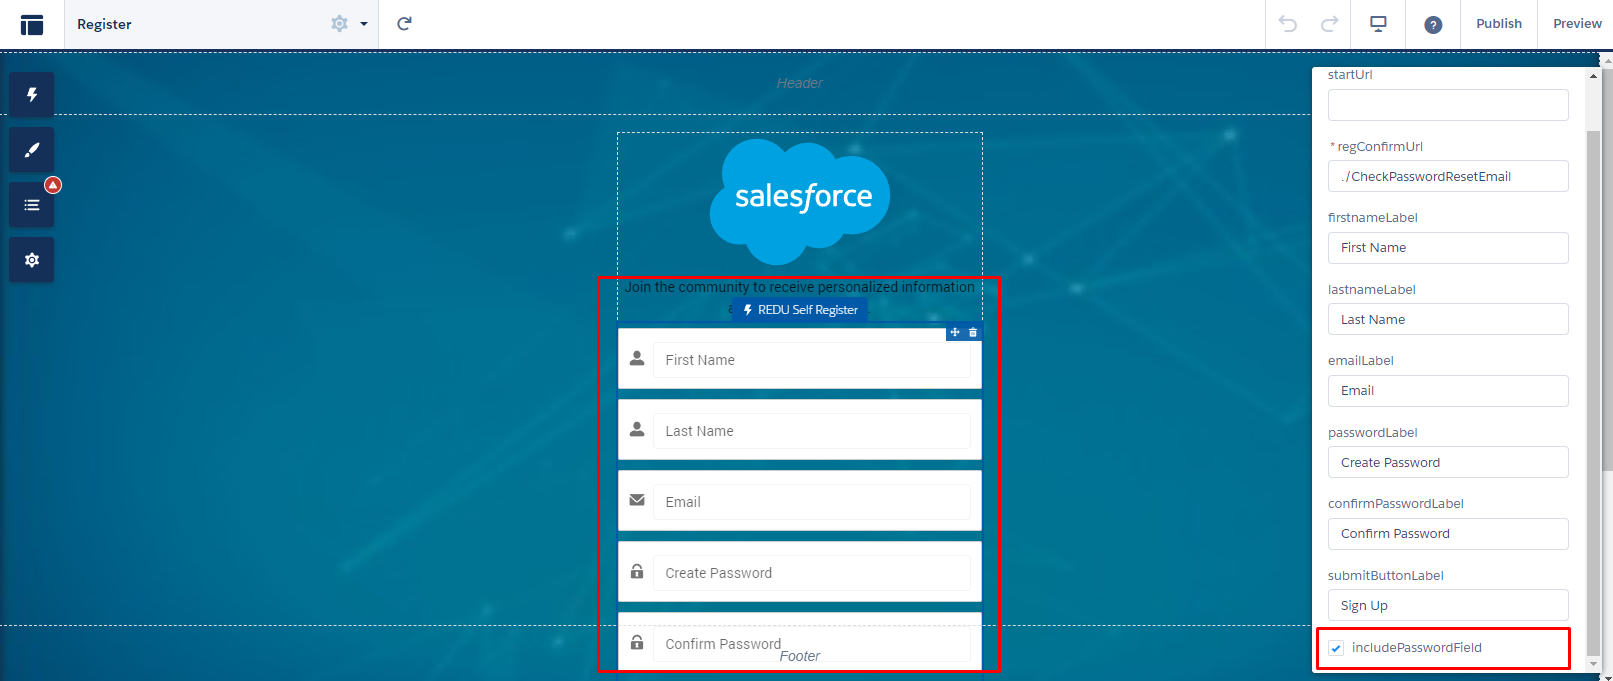
- Make sure the REDU Self Register is configured on the page and the "includePasswordField" is checked.
- Setup Head Markup with reCAPTCHA script.
- From the builder, navigate to Settings >> Advanced >> Edit Head Markup.
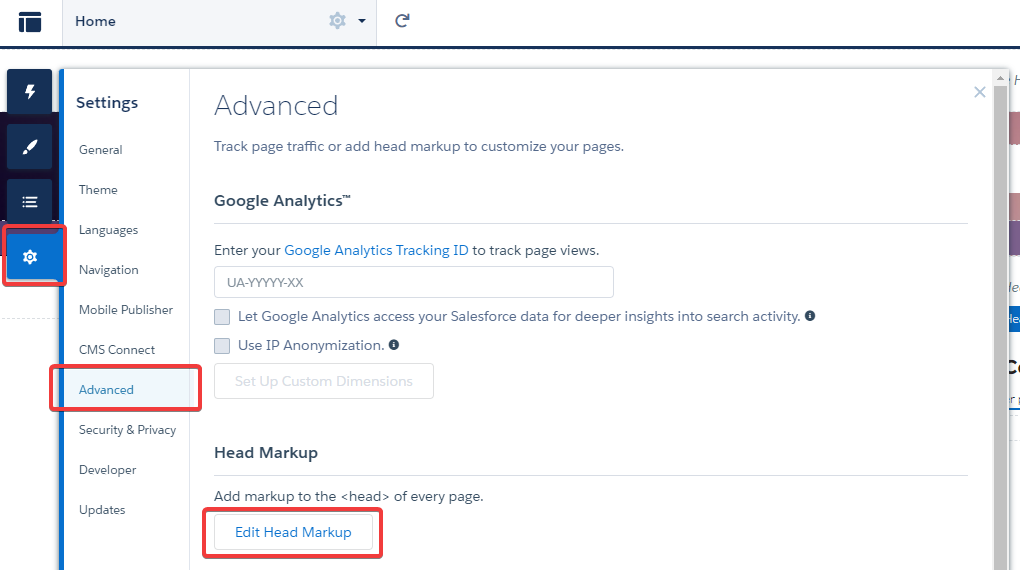
-
Replace the Site Key value as below. You should have the Site Key from the Google reCAPTCHA Setup.
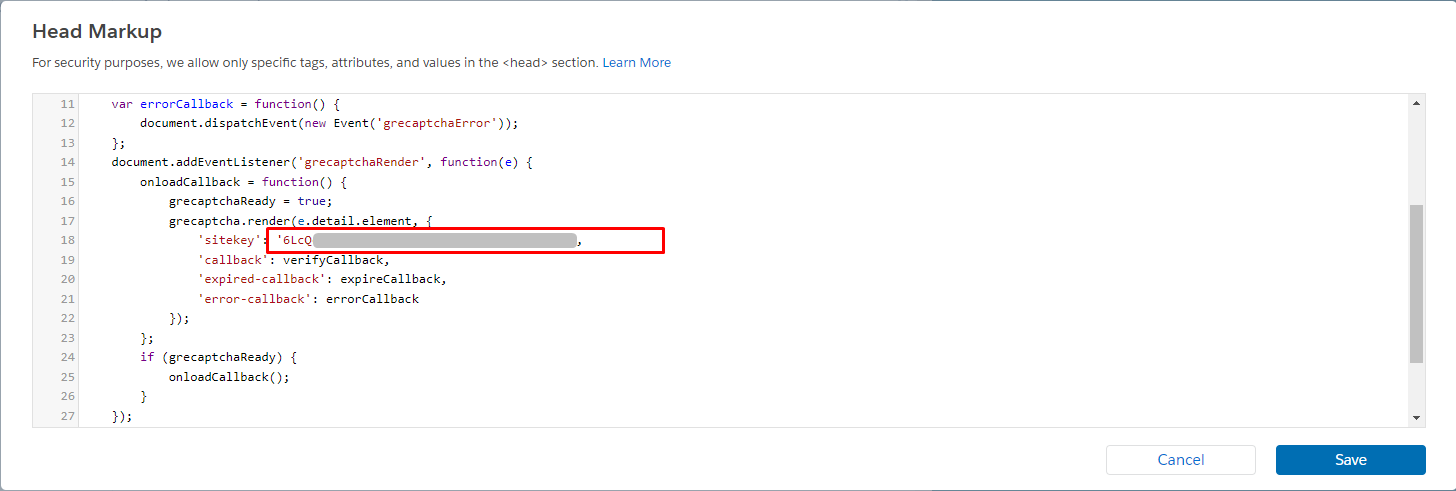
- From the builder, navigate to Settings >> Advanced >> Edit Head Markup.
- Set CSP Setting and allow script URL.
- Go to the Security & Privacy section in the same Settings page:
Settings -> Security & Privacy -> Security Level.
Set the Security Level to: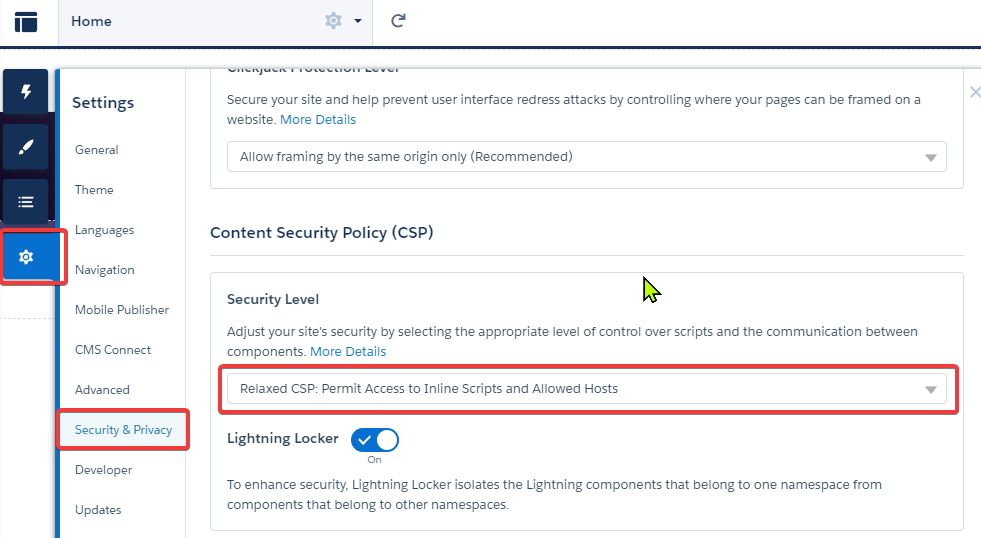
-
Fix CSP Errors related to the reCAPTCHA script.
In the same Security & Privacy section as above, look under CSP Errors and click Allow URL for Blocked Resource that comes from:
www.recaptcha.net
www.gstatic.com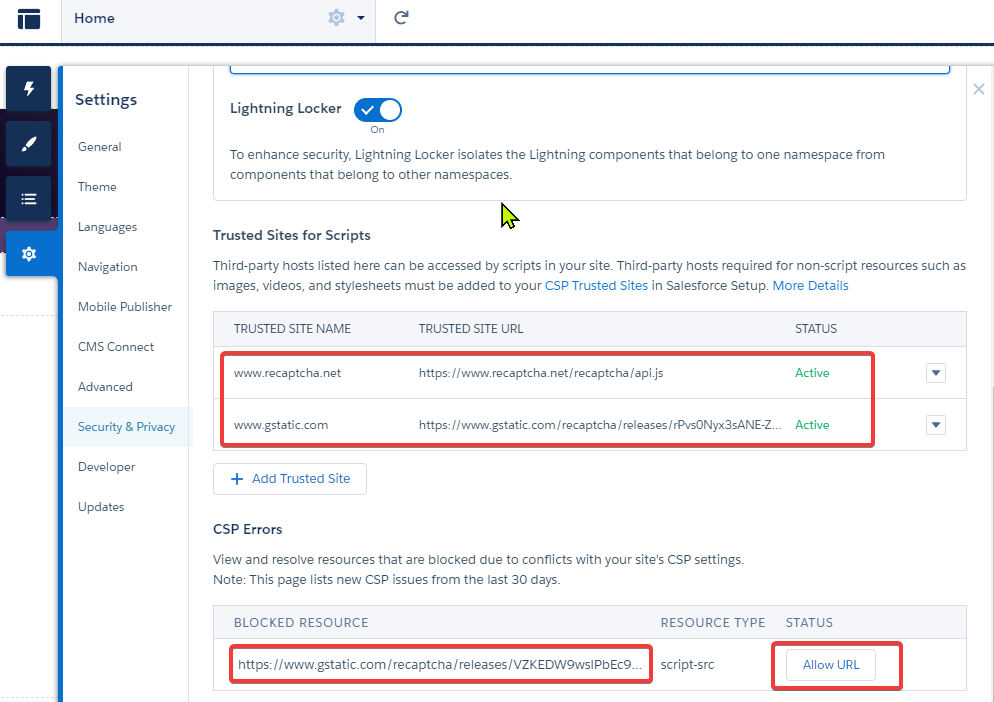
We should then see the script in Blocked Resource that we just allowed moved into the Trusted Sites for Scripts section.
- Go to the Security & Privacy section in the same Settings page:
- Create a Community page for existing students.
- From the top menu, in the Find a page, click New Page.
- Select Standard Page then New Blank Page.
- Choose the "Flexible Layout" and then enter the following:
- Name: ExistingStudent
- URL: ExistingStudent
- Under the layout setting, check the "Override the default theme layout for this page." and set the Theme Layout as "Login".
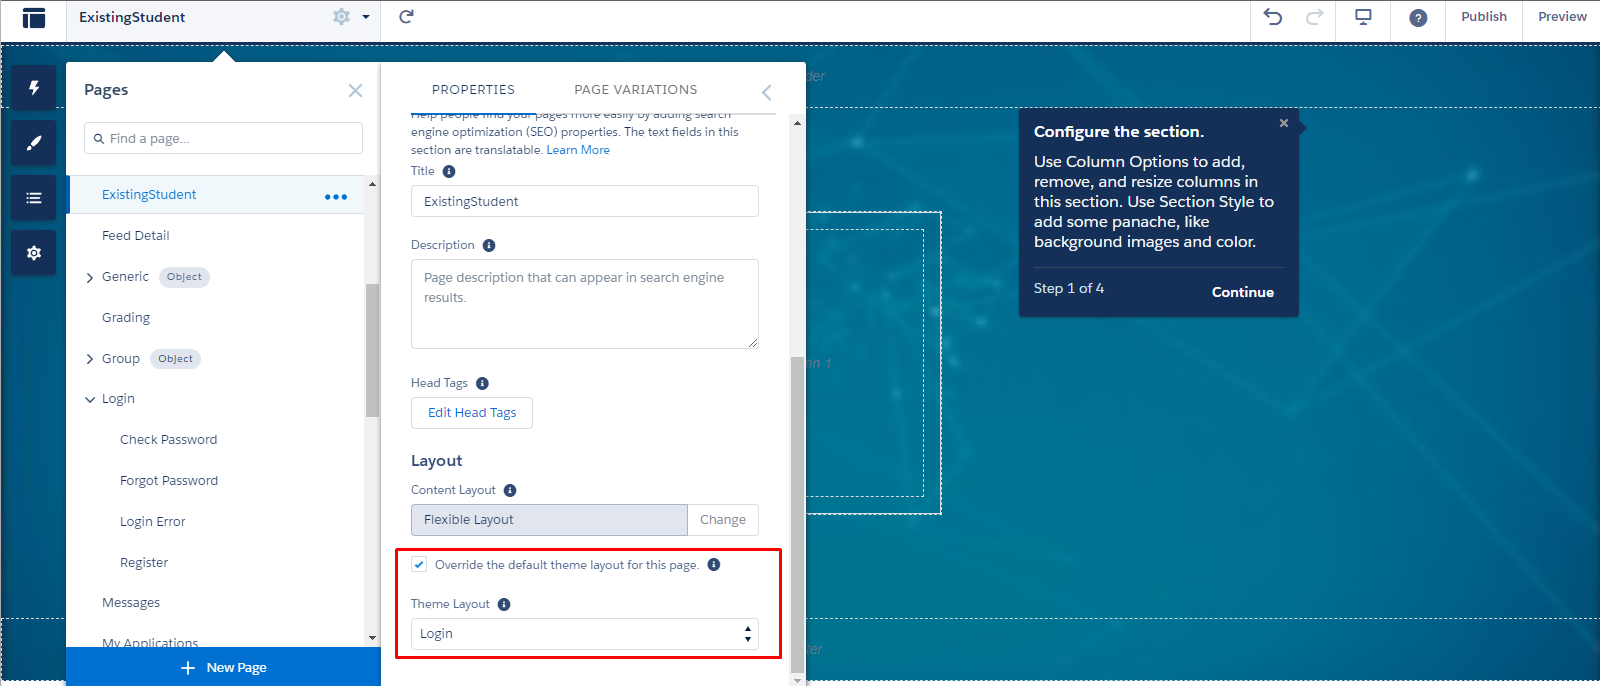
- In the Components, enter Existing Student. Drag and drop the REDU Existing Student component into the desired section of the page.
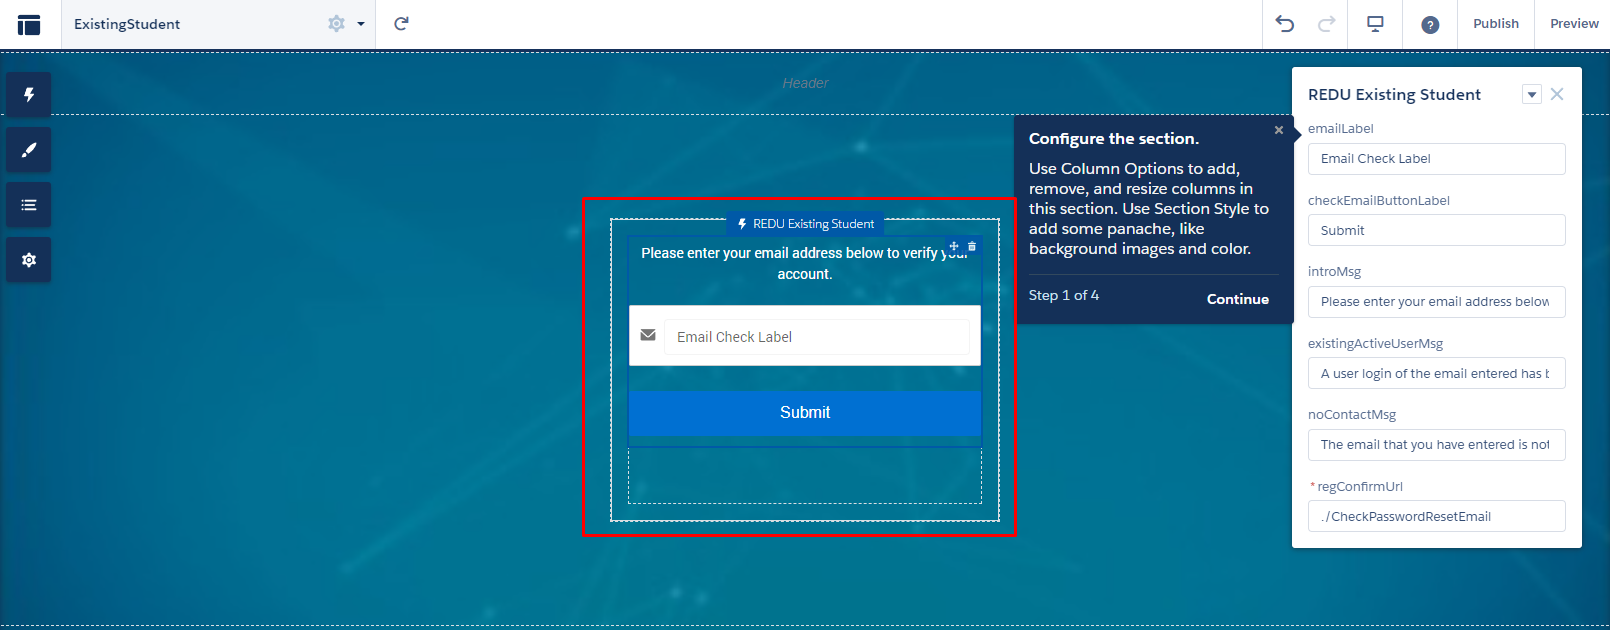
- Then, head on to the REDU Login Form on the Login page. Go to its properties and update the existingStudentURL. For example, /portal/s/ExistingStudent.
- From the top menu, in the Find a page, click New Page.
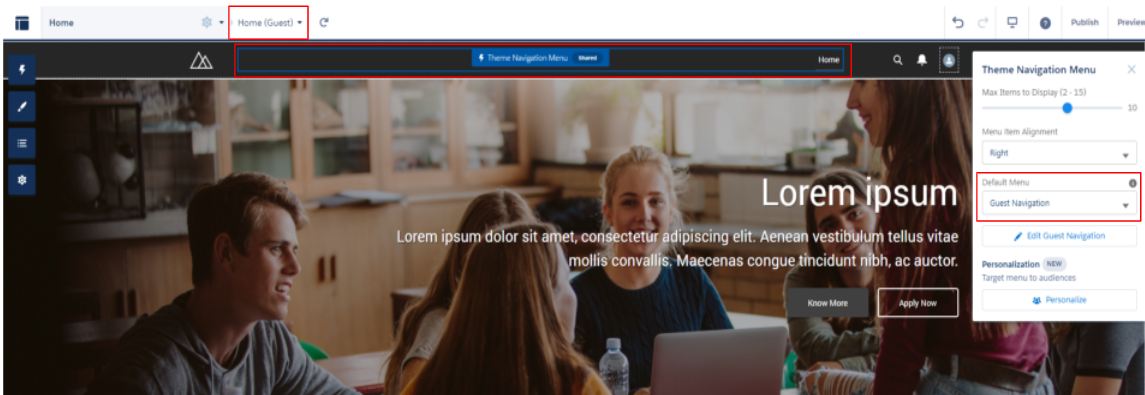
- Check that the Navigation is set up for Guest, Faculty, and Student at the home page. If not, it needs to be assigned.
-
At Home (Guest), click on the navigation. Under Default Menu, select Guest Navigation.
-
Go to Home (Faculty) and click on the navigation. Under Default Menu, select Faculty Navigation.

-
Go to Home (Student) and click on the navigation. Under Default Menu, select Student Navigation is selected.

-
At Home (Guest), click on the navigation. Under Default Menu, select Guest Navigation.
-
Check that the Program Application is set up correctly.
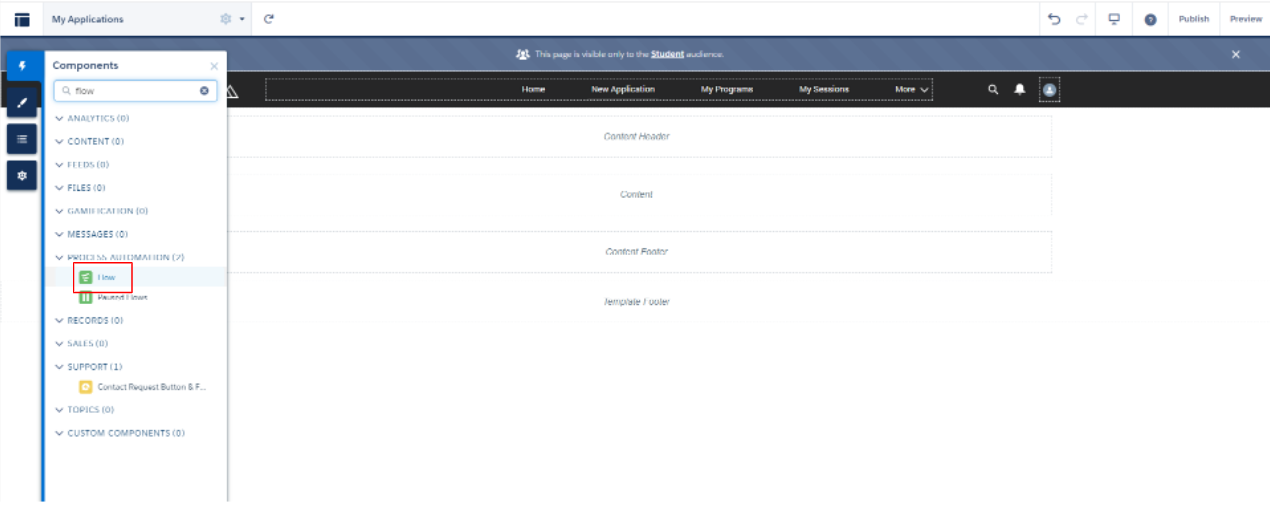
- In the "Find a page" text box, search for My Applications. Then, select My Application. Check if the flow is configured on the page. Add the flow if it is not configured. If you have the same screen shown below, this means your application flow has been added.

- In order to add the Flow to the page, go to Components and search ‘flow’, then drag it to the page.
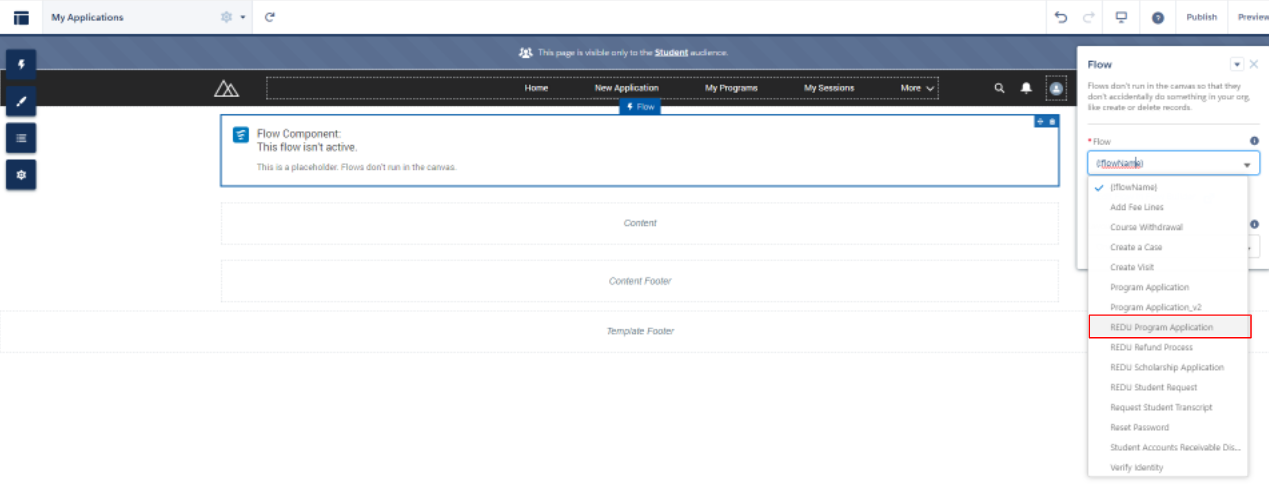
- Click on the flow and assign to REDU Program Application.
- In order to add the Flow to the page, go to Components and search ‘flow’, then drag it to the page.
- In the "Find a page" text box, search for My Applications. Then, select My Application. Check if the flow is configured on the page. Add the flow if it is not configured. If you have the same screen shown below, this means your application flow has been added.
- Publish the page when it's ready to have the changes done above committed.
- Assign Permission Set called REDU Guest Login Permission to the Community Guest User.
- In the Community Builder, navigate to Settings >> General, click on the guest user profile "RIO Education Community Profile".
- Click the button "View User" and select "Site Guest User, RIO Education Community".
- Under the section "Permission Set Assignments", click Edit Assignment and assign permission set "REDU Guest Login Permission".
- To activate the automation that will be giving the Student Users their Permission Set Group:
- Open the Developer Console.
- Go to Debug (on the top menu) -> click on "Open execute Anonymous Window".
-
Paste the following:
redu_USR_AssignCommunityPermSet_TDTM.installTDTMSetting();
- Update Custom Setting.
- Navigate to Salesforce Setup >> Custom Setting >> RIO Education Settings:
- Update the Student - Permission Set Group with the value: REDU_Student_Permission_Group
- Update the Auto Student Community Registration with the value: False.
- Navigate to Salesforce Setup >> Custom Setting >> RIO Education Settings:
- Navigate to Salesforce >> Setup >> Roles and create a new role (e.g.: Administrator).
- Assign the role to your admin user.
Community Workspace
- Navigate to Setup >> Digital Experience >> All Sites >> RIO Education Community and click on "Workspace".
- Select the Administration >> Login & Registration, update the forgot password pad and registration page as below.
- Forgot Password >> Experience Builder Page >> Forgot Password.
- Registration Page Type >> Experience Builder Page >> Register.

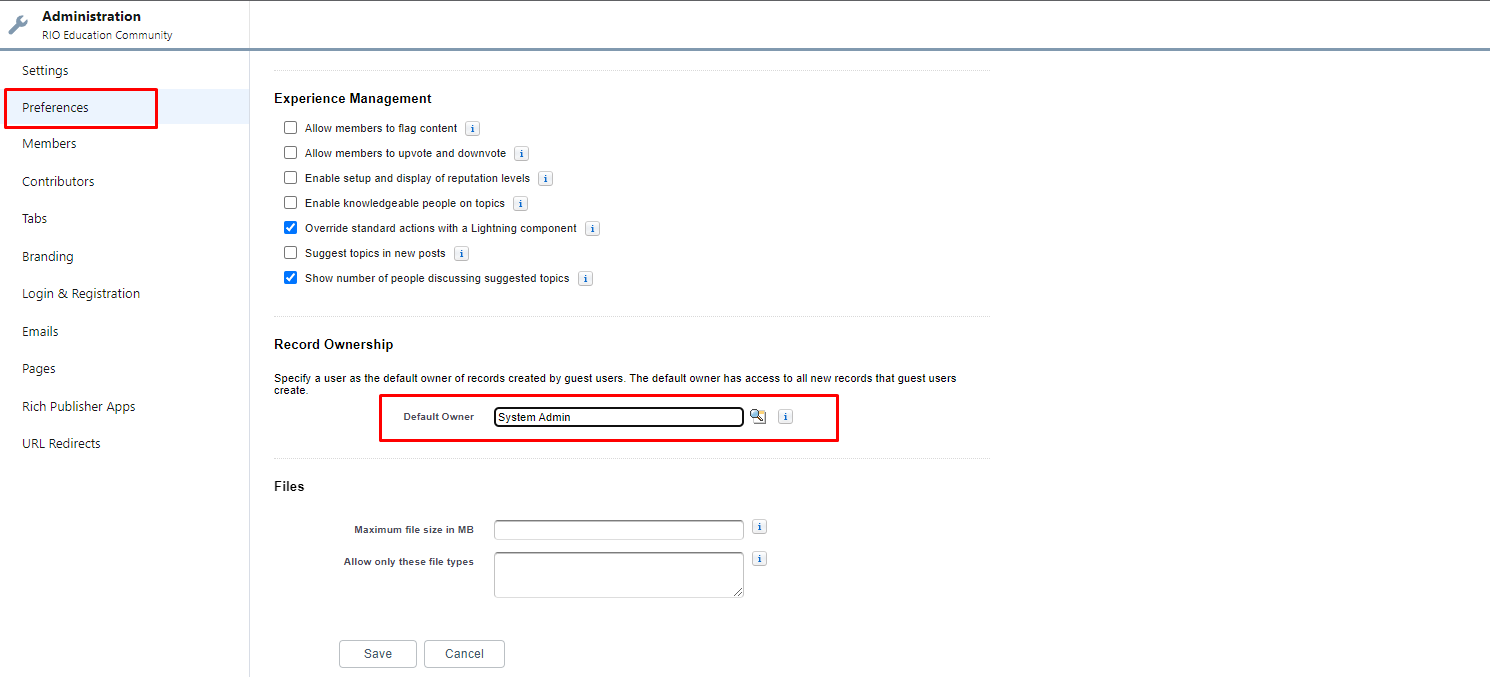
- Navigate to the preferences tab and configure the Default Owner for the record created by the guest user. Ensure that the User acting as Default Owner for the Record generated by the Community has a Role.
- Navigate to the Emails tab then go to Sender section.
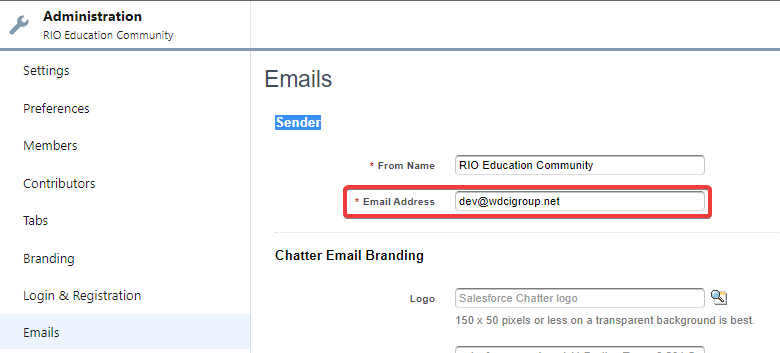
Set the Email address to the appropriate customer email address for the community (whether that be no-reply address or the community administrator).
Testing (Estimate ~ 15 minutes)
We will run through the testing using the following use case:
- Student self-registration.
- Program Application approval.
- Student self-enrollment.
Student Self-registration
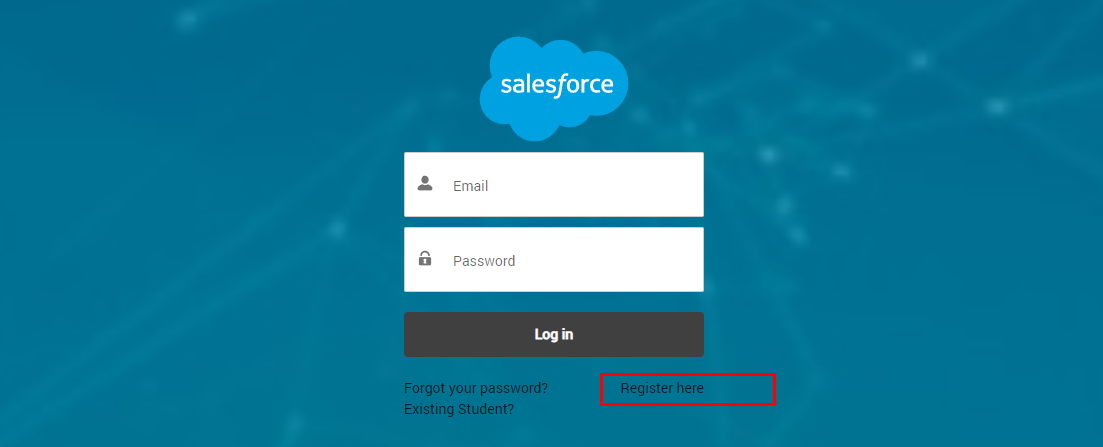
- Navigate to the Student Community login page. For example: https://[your-community-domain]/portal/s/login/
- Click the button "Register here".
- Insert all the required fields and click Sign Up.
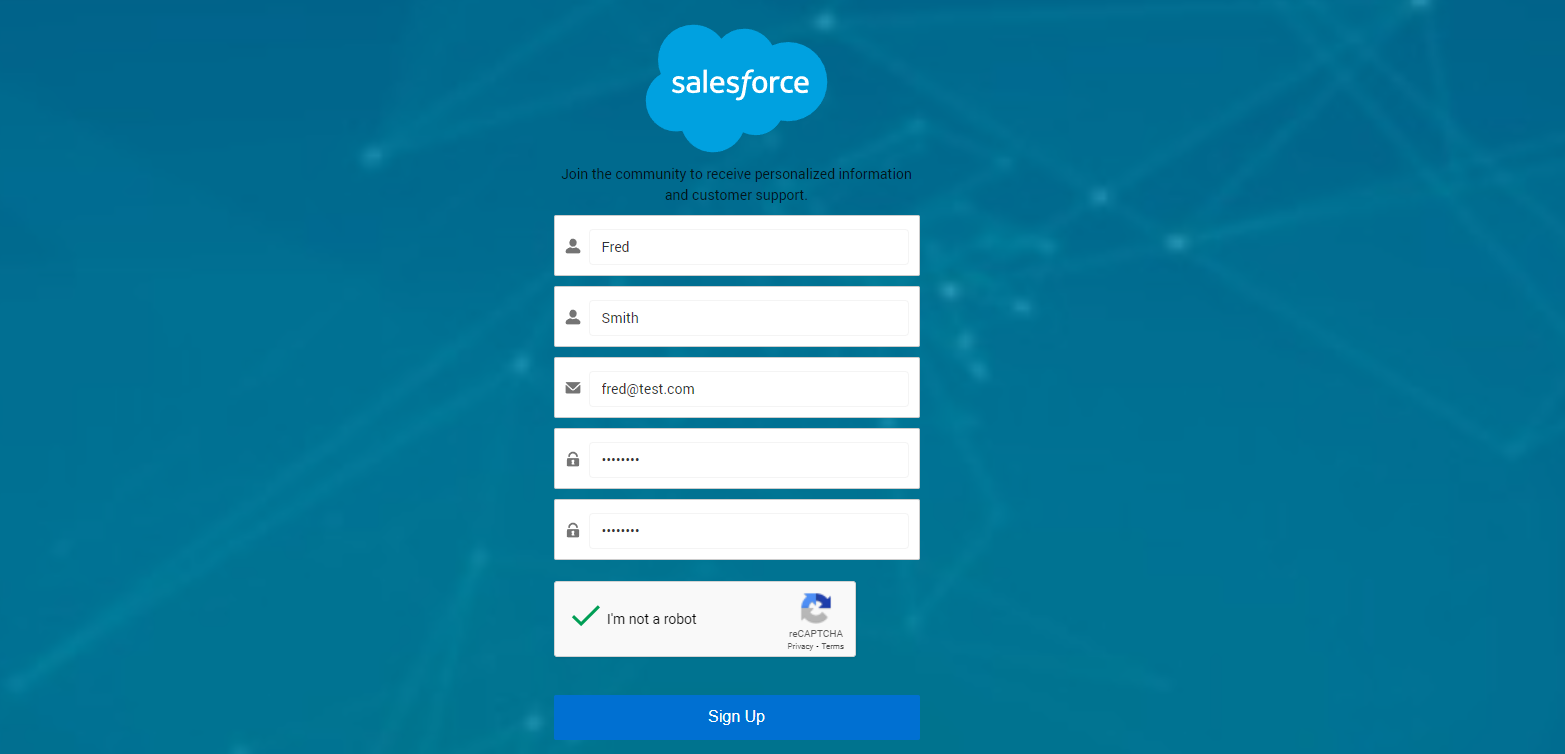
- Once this is done, the student will be directed to the Community home page.
- If you are testing this in a new demo instance that has a limited RIO Education License or trial version (not a sandbox), you will need to assign the RIO Education license to the student user before proceeding to the next step.
- Navigate to Salesforce >> Setup >> User.
- Click on the new user that you have created from the above.
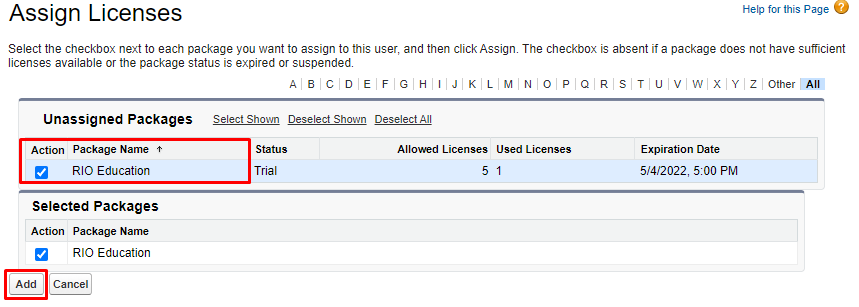
- Scroll to the section - Managed Packages and click "Assign Licenses".

- Select RIO Education and click "Add".
- Navigate to Salesforce >> Setup >> User.
- Click the tab "New Application" to apply for a Program.

- Fill in all the required information and submit the application.
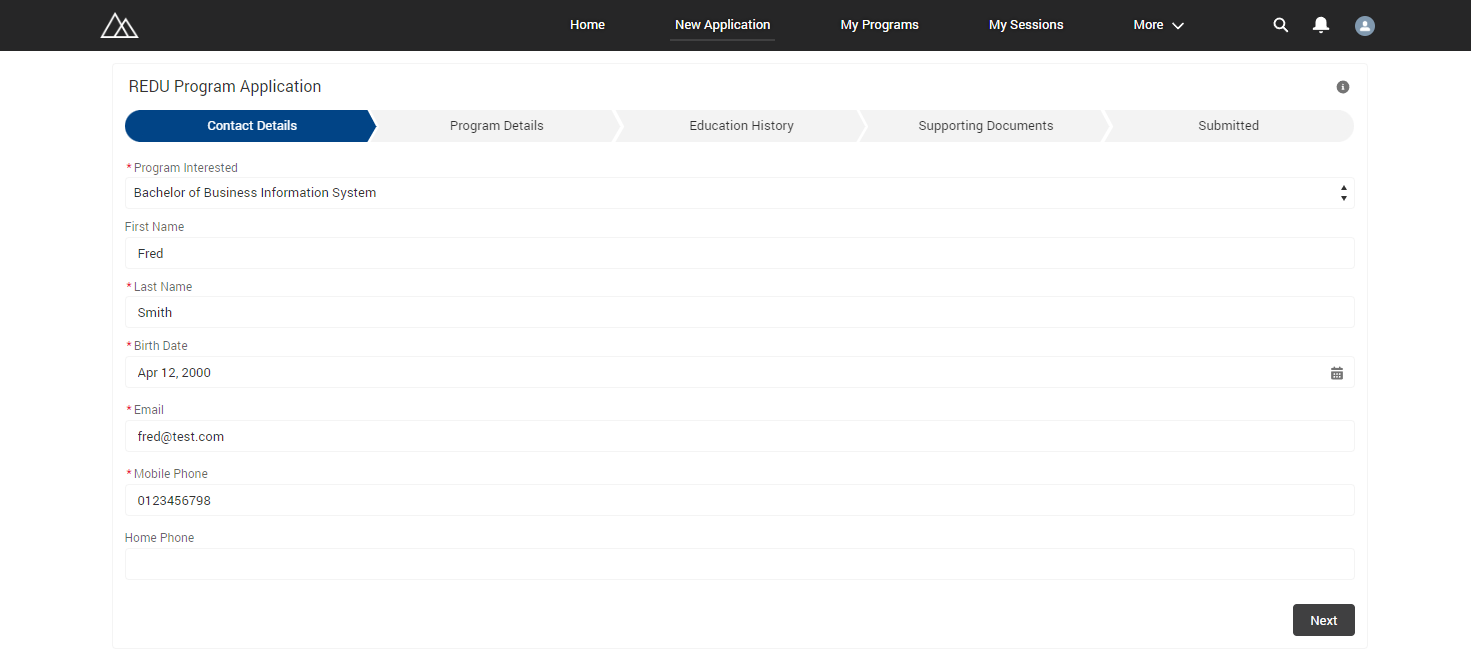
- Once this is done, a Program Application record will be created for the student.
Program Application approval
- Navigate to Salesforce >> Program Application. Click on the record created by the student above.
- Update the Program Application record as Approved. A Program Enrollment record will be created/updated as below:

Student self-enrollment
- Login to the Student Community as the student above.
- Navigate to My Programs >> My Pathway and select the first Term.
- The student is able to enroll in the Courses below:
