Application Requirement and Checklist
Table of Contents
Overview
This article will cover how an institution can set the requirements applicants will need to fulfil when they apply to a Program, such as uploading their academic transcript, or passport (for international students), etc.
The registrar team can also keep track and review these required actions (Requirements) that students will need to fulfil.
Note:
- This acts as just a checklist of the required actions (users can add their own logic and validation, if they wish to).
- This applies to both Application (EDA) and Program Application.
- This can also be applied to other objects, but extra setup is required. See the setup section below.
(For a practical exercise, you may try this RIO Challenge here.)
Use case
A university is offering a 'Bachelor of Business' Program.
The registrar team wants the applicants to upload supporting documents when they submit their Program Application forms.
| Required supporting documents | Who is required to fulfil this? |
|
All applicants. |
|
Local applicants. |
|
International applicants. |
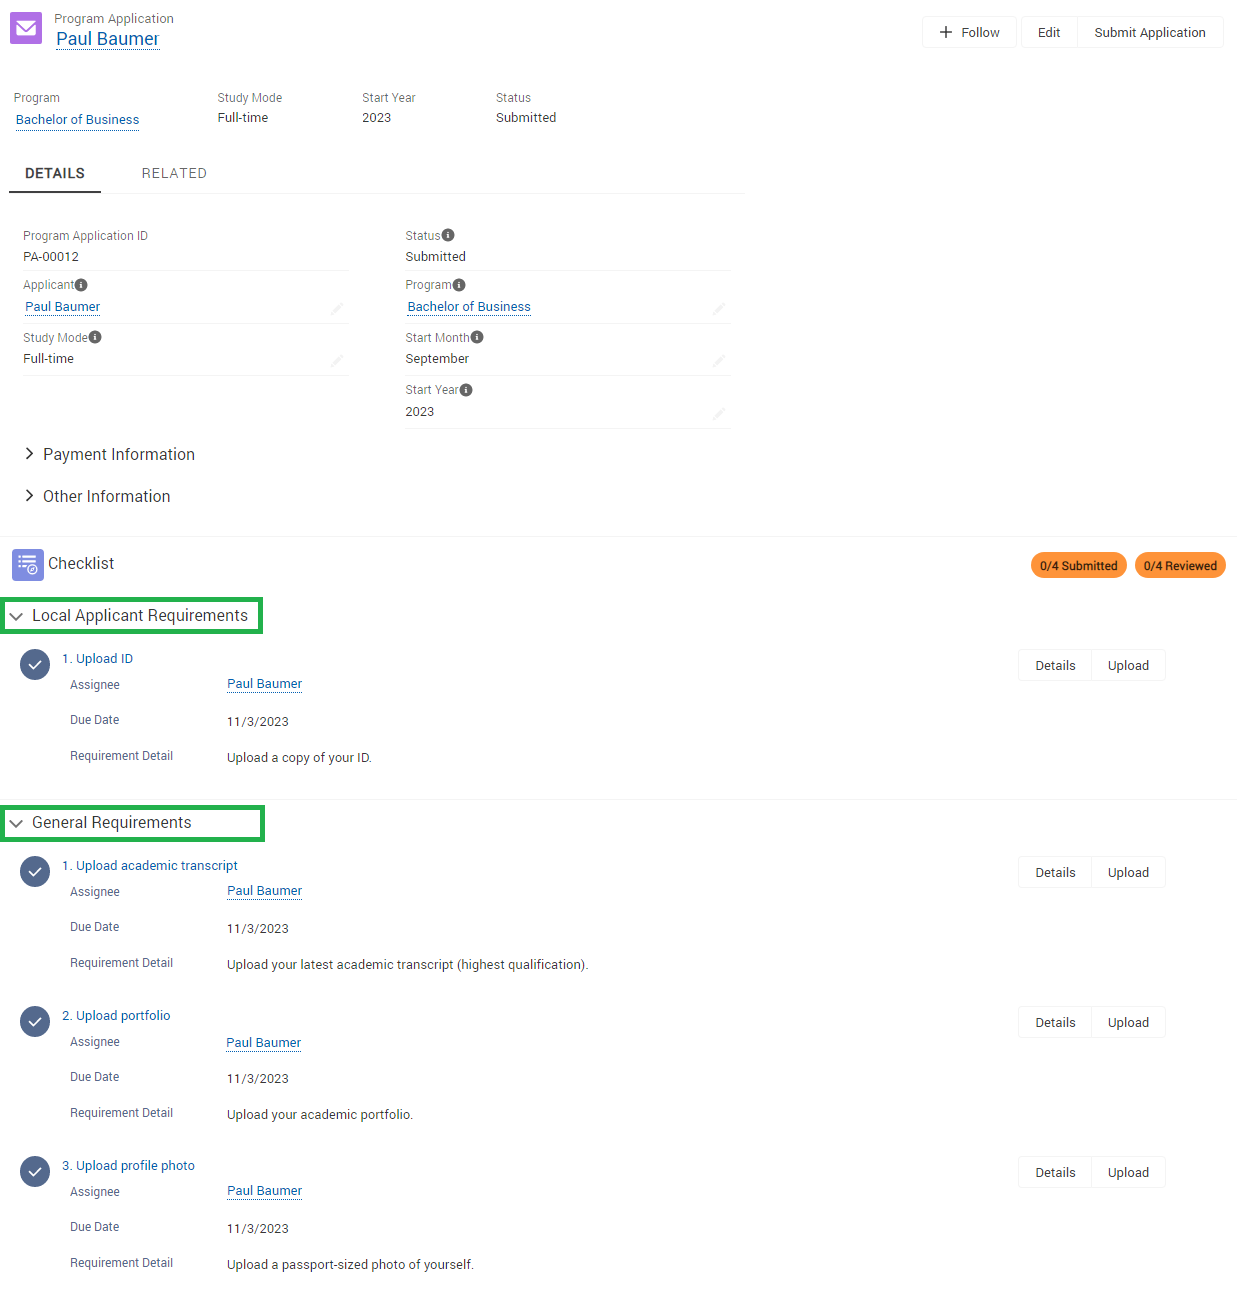
Paul is a local applicant ('International Student' = FALSE on his Contact record).
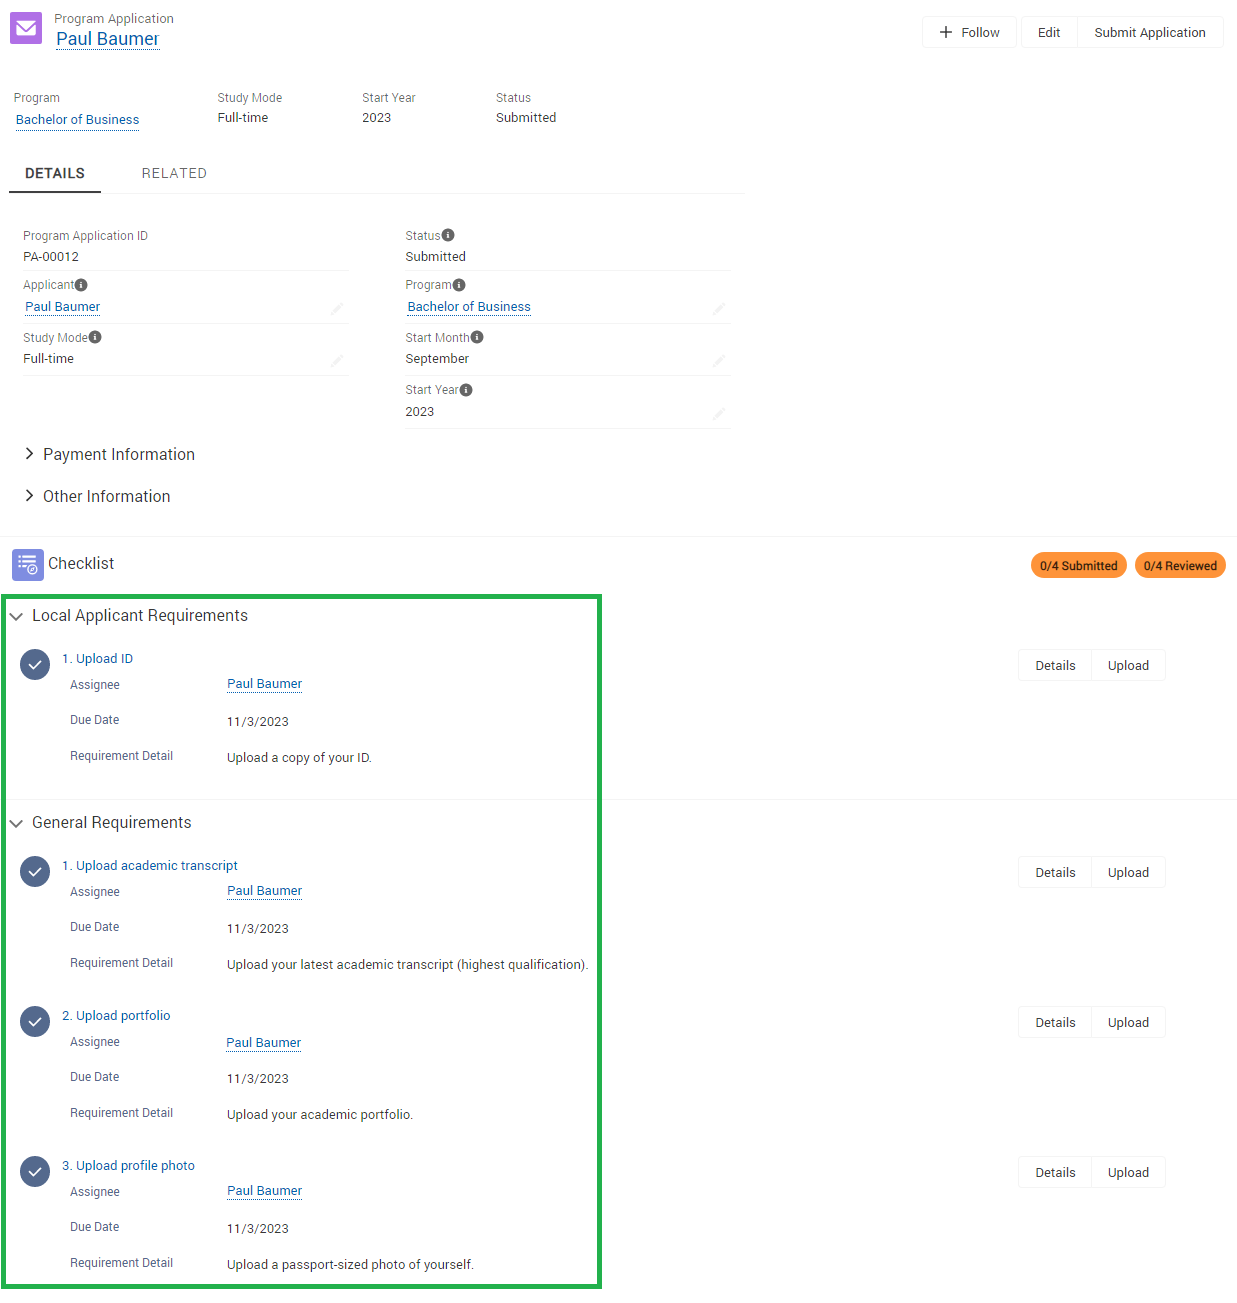
When he submits a Program Application form, he will be presented with a checklist.
He will need to upload his ID as part of the requirements for local applicants, on top of the general requirements.
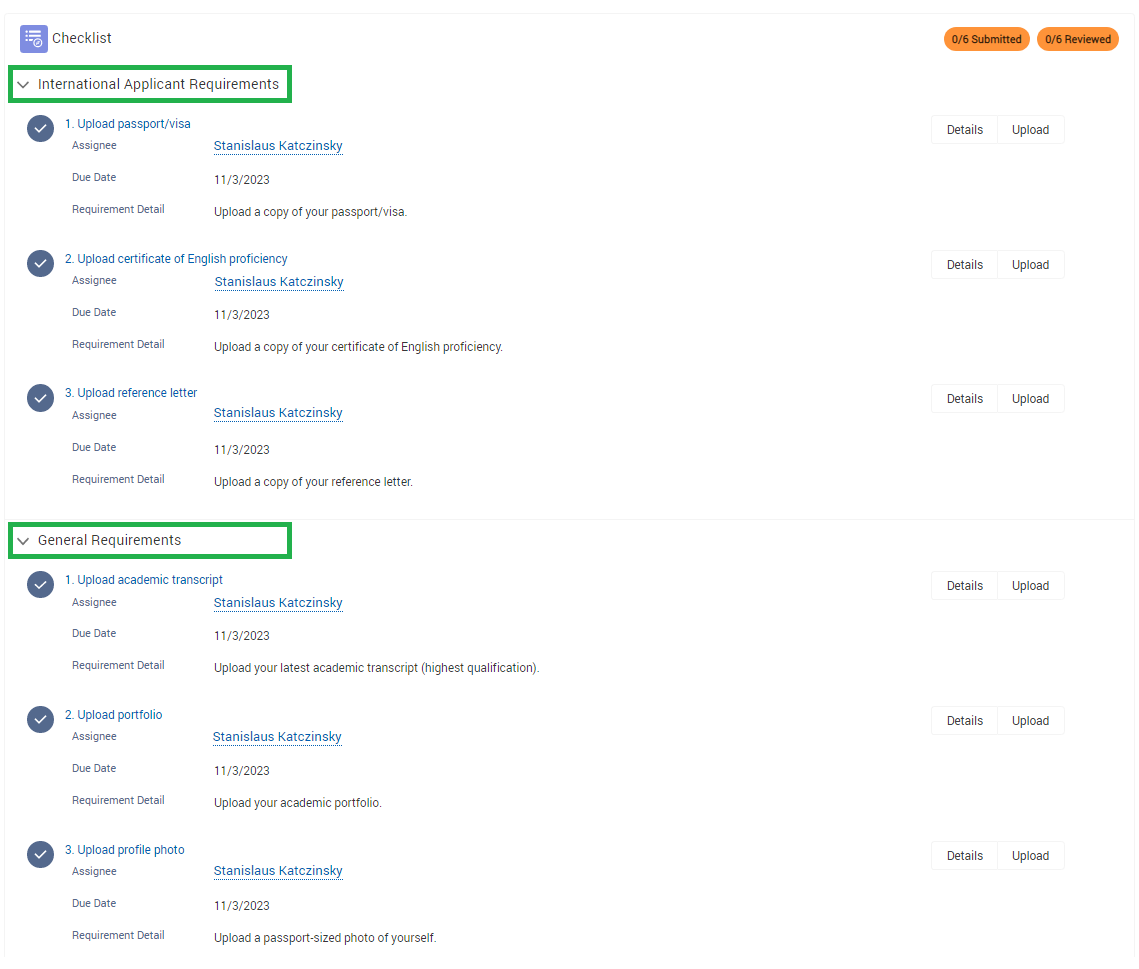
On the other hand, Katczinsky is an international student ('International Student' = TRUE on his Contact record).
His requirement checklist will display the requirements for international applicants.
The general requirements will be displayed as well, since that is for all applicants to fulfil.
Both applicants can interact with the 'Upload' button to upload their supporting documents.
Note: If the student accidentally uploaded the wrong file, they should click on 'Close', and proceed to upload another file again.
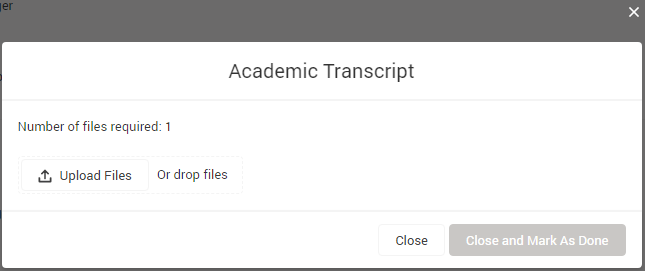
Once the student has completed the required actions, the student should click on 'Close and Mark as Done'.
- The student will no longer be able to upload again nor take further actions (although admin can help to reset this - read more below).
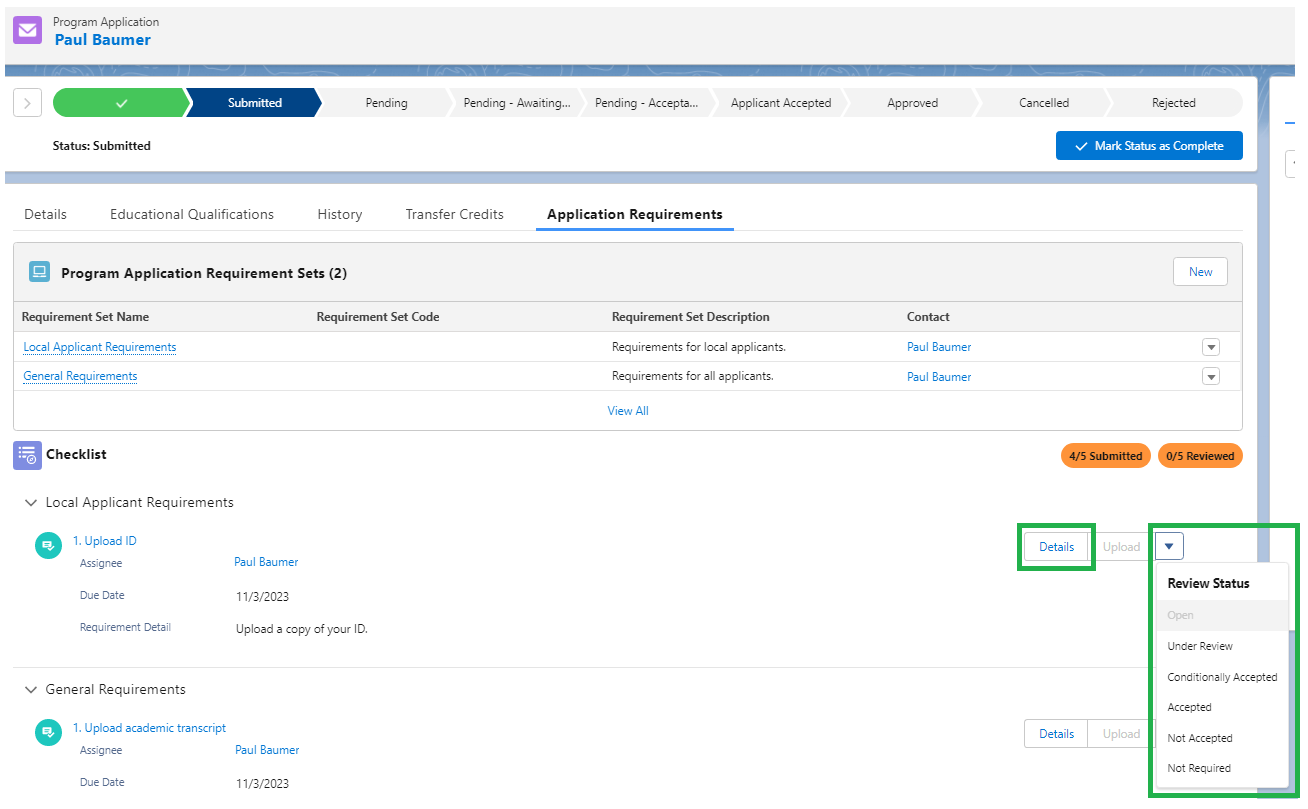
The checklist will indicate that the Requirements have been submitted for the registrar to review.

From the console view, the admin can open the Program Application records and click on 'Details' to review the uploaded documents.
Once they are satisfied that the Requirements are met, they can approve them, by setting the 'Review Status' as 'Accepted'.
Note:
If the student has uploaded a wrong file and needs to re-upload again, the admin can open the individual Requirement (by clicking on 'Details') and uncheck the 'Submitted' checkbox. The 'Review Status' should remain open too.
This will override the submit date, and the student can continue to upload again.

Once the registrar is satisfied with all the requirements, he/she can proceed with the Program Application process.
Notes
- There is currently no validation to ensure that the application process cannot continue until the Requirements are met.
This just serves as a checklist for students and faculty to keep track of the Requirements.
- As of now, the only Requirements that are supported are the 'Upload' types.
'Action' types can be created, but since they have no logic or validation, they just serve as a reminder for the user to do something.
How it works
Requirement objects are the actions that the applicants will need to fulfill.
Multiple Requirements can be grouped under a Requirement Set, such as the ones covered in the use case.
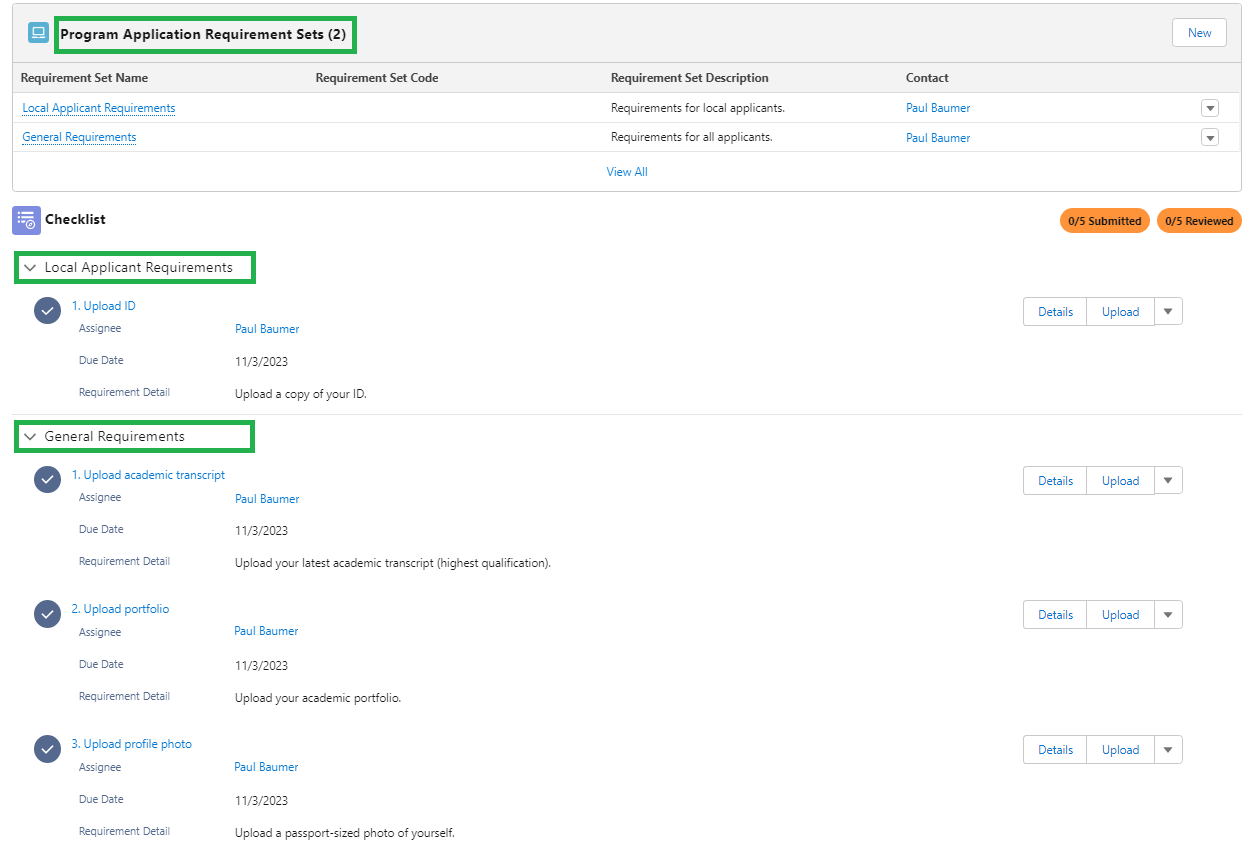
Both objects are only generated when the applicant submits the Program Application form (or performs any criteria that triggers it).
Templates can be created for these Requirement Sets (and underlying Requirements).

When the Program Application is created/updated and meets the criteria defined, the Requirement Set Template and Requirement Template will be cloned as Requirement Set and Requirement (child objects).
- Please note that if a new Requirement Template is added to the Requirement Set Template after that, the new Requirement will not be reflected in the Program Application page.
- It will be only when the Program Application is updated and meets the criteria again.
See here for the trigger: SOBJ_CreateRequirementSet_TDTM.
Setup
1. Requirement Set Template
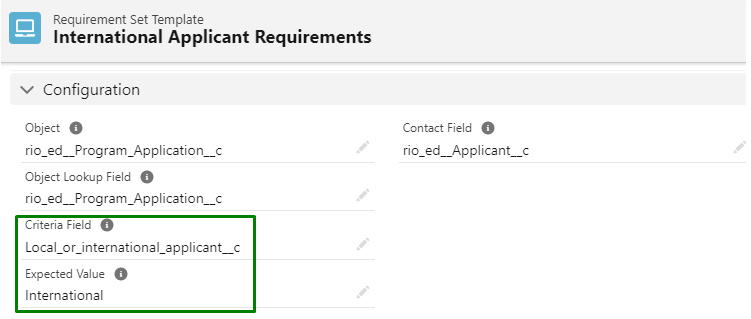
The first object the admin will need to create is a Requirement Set Template. This is to define what Requirements are needed for what object, and when. This is a template that will apply to all target objects.
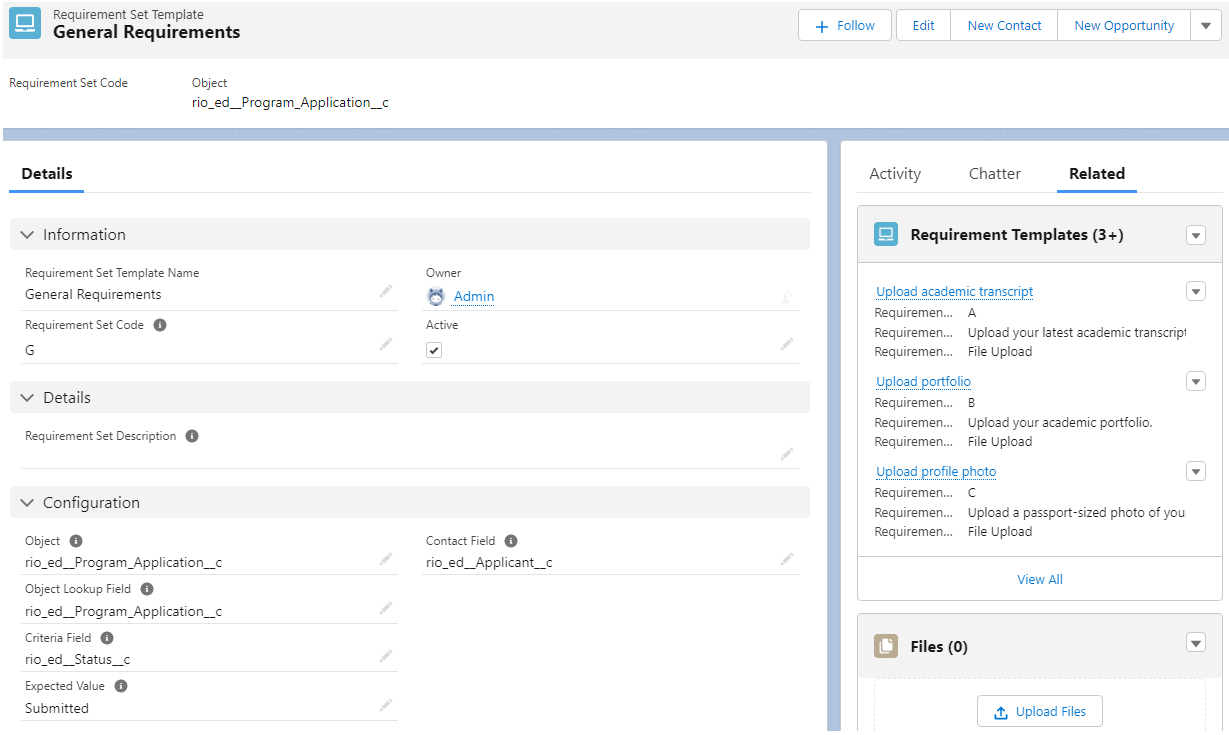
- The 'Object' field contains the API name of the target object, which in this scenario, is the Program Application.
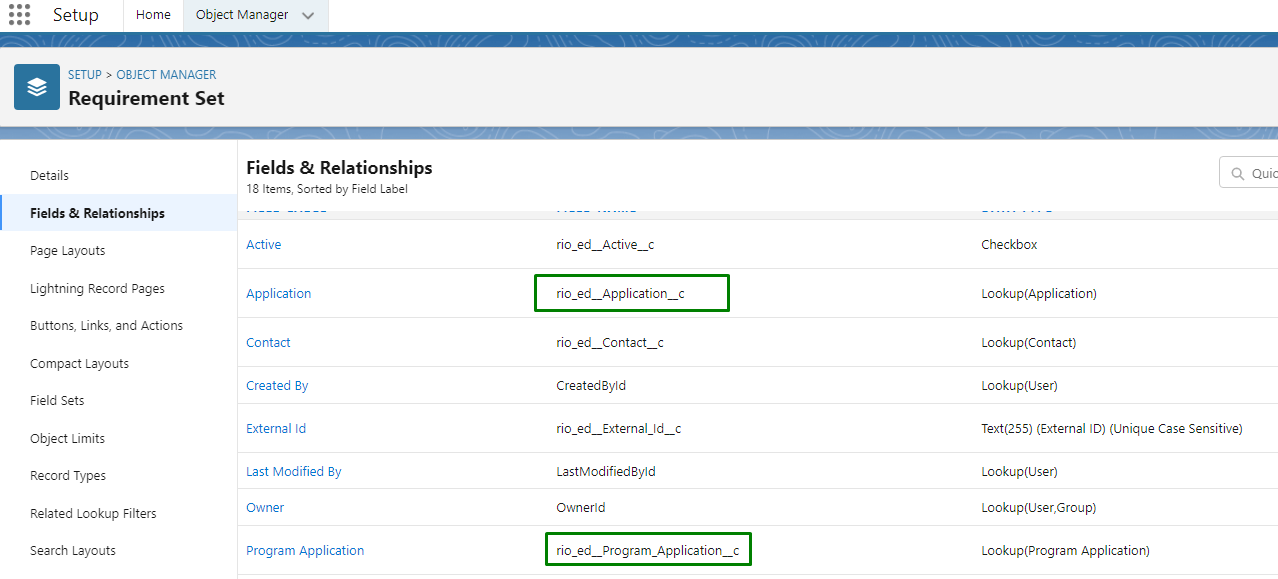
- The 'Object Lookup Field' contains the API name of the Requirement Set's lookup field to the Program Application (since Program Application is the target object).
-
By default, the Requirement Set has lookup fields to Application (EDA) and Program Application.
-
If your target object is not their one of those 2, you must create a new lookup field on the Requirement Set that looks up to that target object, and use it on the Requirement Set Template's 'Object Lookup Field'.
You will also need to create a copy of SOBJ_CreateRequirementSet_TDTM for the target object.
-
By default, the Requirement Set has lookup fields to Application (EDA) and Program Application.
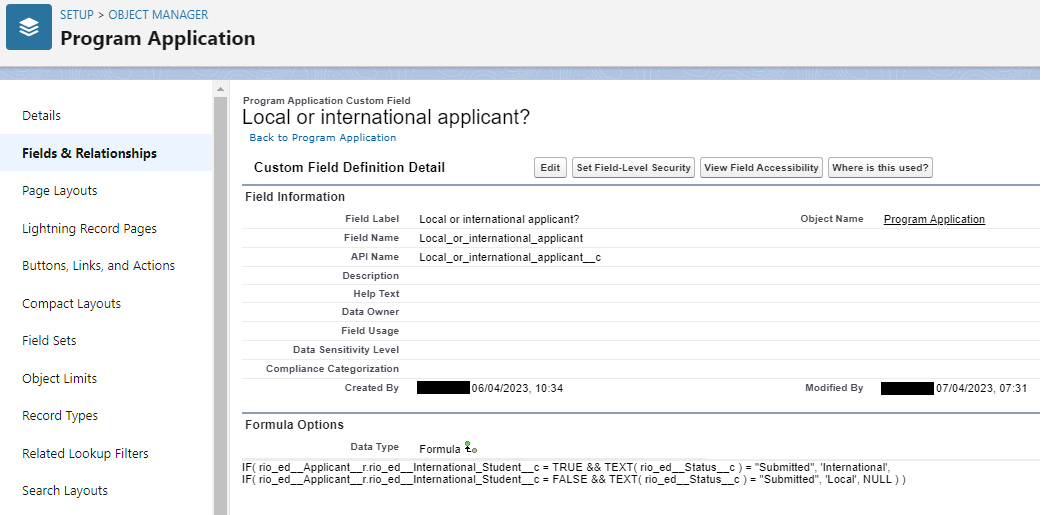
- The 'Criteria Field' and 'Expected Value' determines when will the Requirements be active for the student to act upon.
In this scenario, it is when the Program Application's status is 'Submitted'.
- The admin will also create Requirement Templates under this object.
- Important: The Requirement Set Code must be populated with a unique value in order for this to be displayed (if there are multiple other Requirement Set Templates).
2. Requirement Template
The Requirement Templates contain details on the required actions that the student will need to complete.
For example:
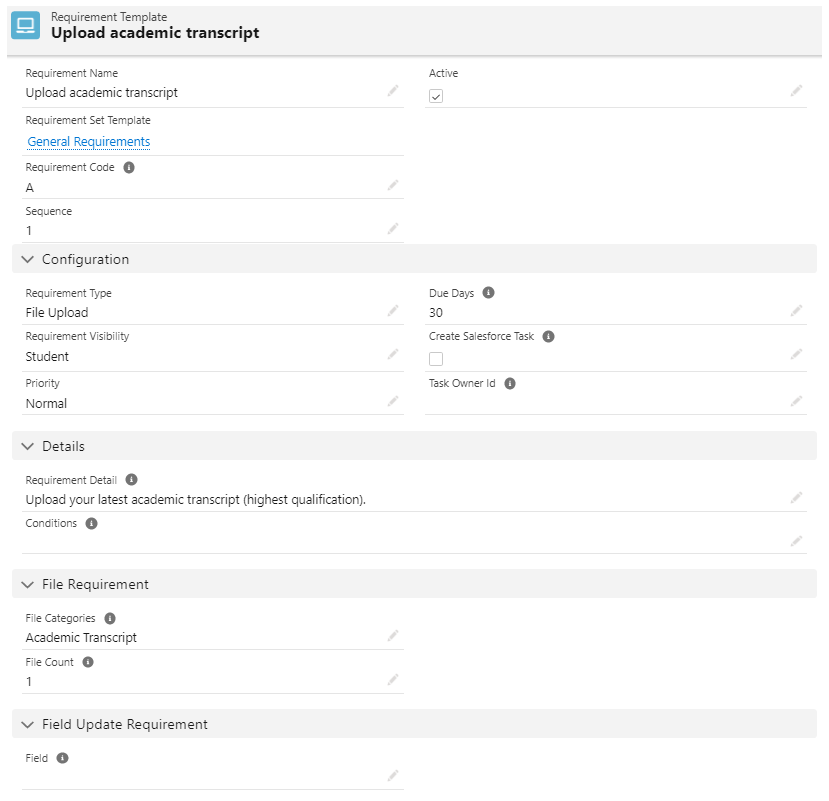
- 'Requirement Type' is set to 'File Upload', since the students need to upload their files.
- 'Requirement Visibility' is set to 'Student'.
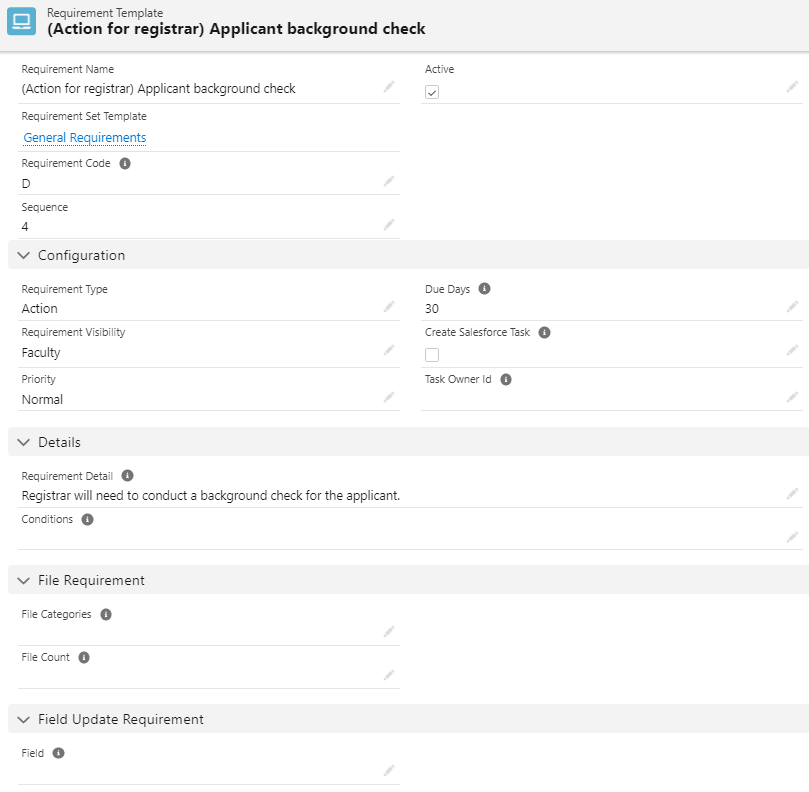
This means that the Requirement can be viewed by students, and is meant for them to complete.- If set to 'Faculty', the Requirement can only be viewed by faculty and admin, and is meant for the faculty to complete.
- If set to 'Internal', the Requirement can only be viewed by admin, and is meant for admin to complete.
- If set to 'Faculty', the Requirement can only be viewed by faculty and admin, and is meant for the faculty to complete.
- The 'Due Days' will begin based on the date the Requirements are submitted to the student to perform.
- If a specific and fixed date is preferred, set the 'Due Date' in the Requirement record instead, which will be generated once the Program Application status is 'Submitted'.
- If a specific and fixed date is preferred, set the 'Due Date' in the Requirement record instead, which will be generated once the Program Application status is 'Submitted'.
- The 'File Count' determines how many files are needed to be uploaded, before the Requirement can be marked as done.
- Important: The Requirement Code must be populated with a unique value in order for this to be displayed (if there are multiple other Requirement Templates).
Requirement for applicant (visibility = student):
Requirement for registrar (visibility = faculty or admin):
Note: The first two objects created above (Requirement Set Template, and Requirement Template) are templates. The Requirements (which the student can interact with) will be copied from this template, when the Criteria Field meets the Expected Value (i.e. Program Application's status = Submitted).
3. Requirement Set (and Requirements)
Once the student submits a Program Application (criteria field meets expected value), this will automatically create:
-
Requirement Set.
- Copied from the Requirement Set Template.
- Tracks how many Requirements has the student submitted (completed the task), and how many have been reviewed by admin.
-
Requirement.
- Copied from the Requirement Template.
- For the student to complete, and for the admin to review and approve.
These records will appear on a checklist in the Program Application page, where students can then perform the required actions, and admin/faculty will then review and approve them.
The Requirements as they appear on the checklist in Student Community view:
(Note: You will need to set up the RIO Ed - Requirement Checklist Manager on the Community Builder.)
The Requirements as they appear on the checklist in admin console view:
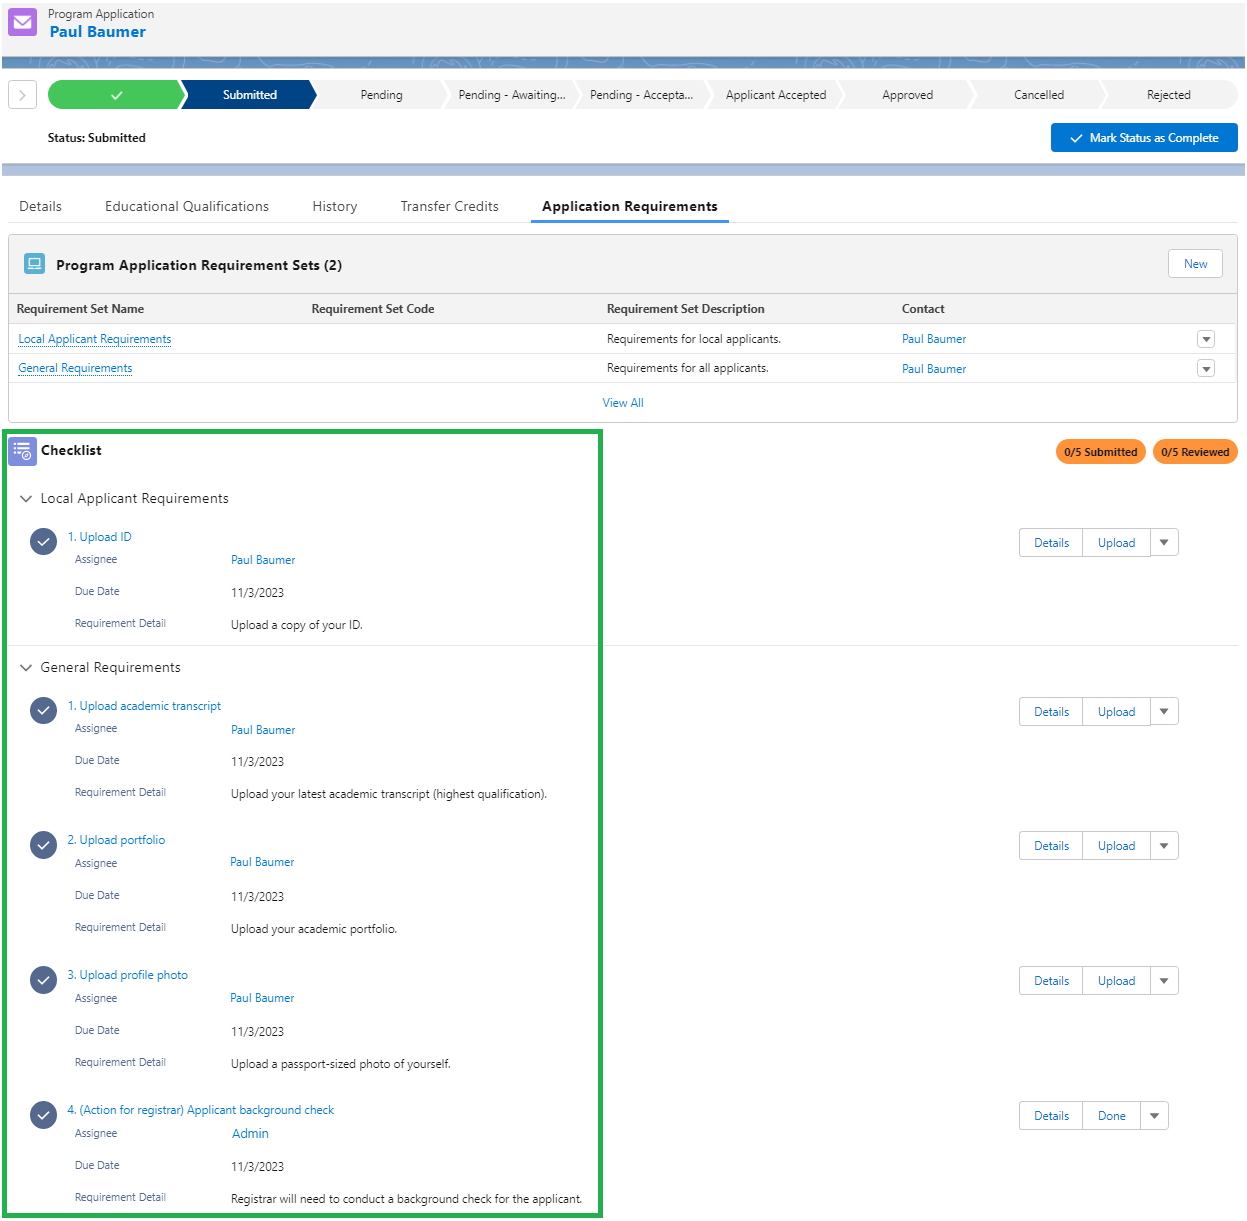
Checklist wizard
To have the Requirements displayed on a checklist for students and faculty to interact with, the RIO Ed - Requirement Checklist Manager needs to be added in the Program Application (or Application) page.
See here for more details on the checklist.

